
If you’re looking to spice up your mealtime routine, Japanese cuisine has got you covered with a variety of delicious and easy recipes. From comforting ramen to sushi rolls and savory stir-fries, there’s something for everyone to enjoy. Let’s get creative in the kitchen with some tasty Japanese recipe ideas that are sure to impress!
Miso Soup with Tofu and Seaweed
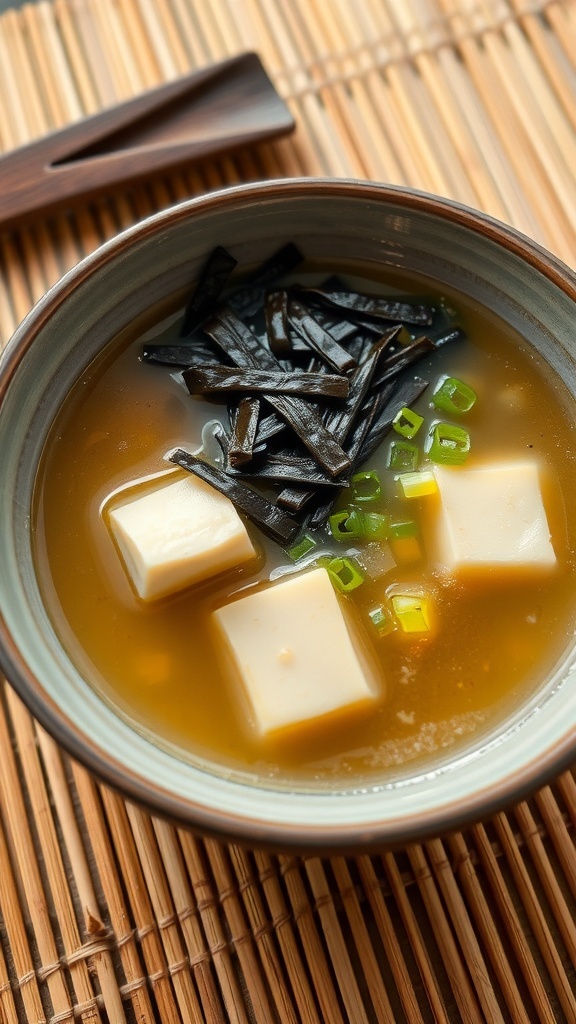
Miso soup is a staple in Japanese cuisine, loved for its comforting warmth and rich flavors. This bowl features soft tofu cubes, savory seaweed, and a delicious miso broth. It’s perfect for a quick meal or as a side dish.
The ingredients are simple yet packed with nutrition. Tofu adds protein, while seaweed brings in essential minerals. This soup is not just tasty; it’s also a great way to warm up on a chilly day.
Making miso soup at home is easy and rewarding. You can customize it by adding vegetables or proteins of your choice. Let’s get into the recipe!
Ingredients
- 4 cups dashi broth (or water)
- 3 tablespoons miso paste
- 1 cup soft tofu, cubed
- 1/2 cup dried seaweed (wakame)
- 2 green onions, sliced
Instructions
- Prepare the Broth: In a pot, bring the dashi broth to a gentle simmer over medium heat.
- Add Miso: In a small bowl, mix the miso paste with a bit of hot broth until smooth. Stir this mixture back into the pot.
- Add Tofu: Gently add the cubed tofu to the soup, allowing it to warm through for about 2-3 minutes.
- Incorporate Seaweed: Add the dried seaweed and let it rehydrate for another minute.
- Finish: Remove from heat and sprinkle sliced green onions on top before serving.
Teriyaki Chicken with Glazed Vegetables
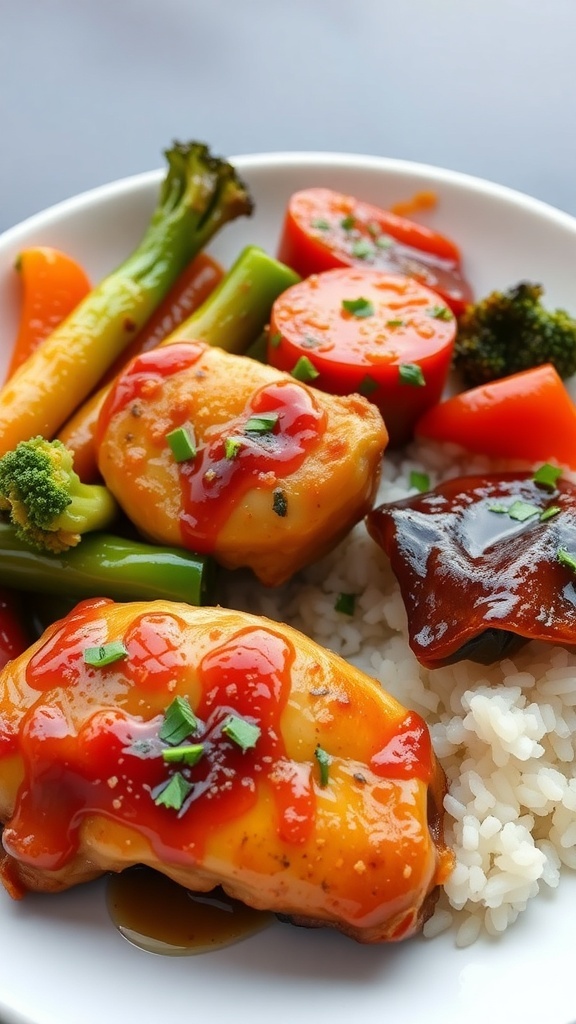
Teriyaki chicken is a classic dish that brings a taste of Japan right to your kitchen. The chicken is tender and juicy, coated in a sweet and savory teriyaki sauce that makes every bite delightful. Paired with vibrant glazed vegetables, this meal is not just tasty but also visually appealing.
The image showcases perfectly cooked chicken pieces drizzled with a glossy teriyaki sauce. The colorful vegetables, including broccoli, carrots, and bell peppers, add a fresh crunch and a pop of color to the plate. Served over a bed of fluffy rice, this dish is sure to impress anyone at the dinner table.
Making teriyaki chicken is simple and fun. You can customize the vegetables based on your preferences or what you have on hand. This dish is perfect for a weeknight dinner or a special occasion.
Ingredients
- 4 boneless, skinless chicken thighs
- 1/4 cup soy sauce
- 2 tablespoons honey
- 1 tablespoon rice vinegar
- 1 tablespoon sesame oil
- 2 cloves garlic, minced
- 1 teaspoon grated ginger
- 2 cups mixed vegetables (broccoli, carrots, bell peppers)
- 2 tablespoons olive oil
- 2 cups cooked rice
- Chopped green onions for garnish
Instructions
- Prepare the Marinade: In a bowl, mix soy sauce, honey, rice vinegar, sesame oil, garlic, and ginger. Add the chicken thighs and marinate for at least 30 minutes.
- Cook the Chicken: Heat a skillet over medium heat. Remove chicken from the marinade and cook for about 5-7 minutes on each side until fully cooked. Pour the remaining marinade into the skillet and let it simmer for a few minutes until thickened.
- Glaze the Vegetables: In another pan, heat olive oil over medium heat. Add the mixed vegetables and sauté for about 5 minutes until tender. Drizzle with a bit of soy sauce for extra flavor.
- Serve: Place the cooked rice on plates, top with teriyaki chicken, and add the glazed vegetables on the side. Garnish with chopped green onions before serving.
Gyoza Dumplings with Dipping Sauce
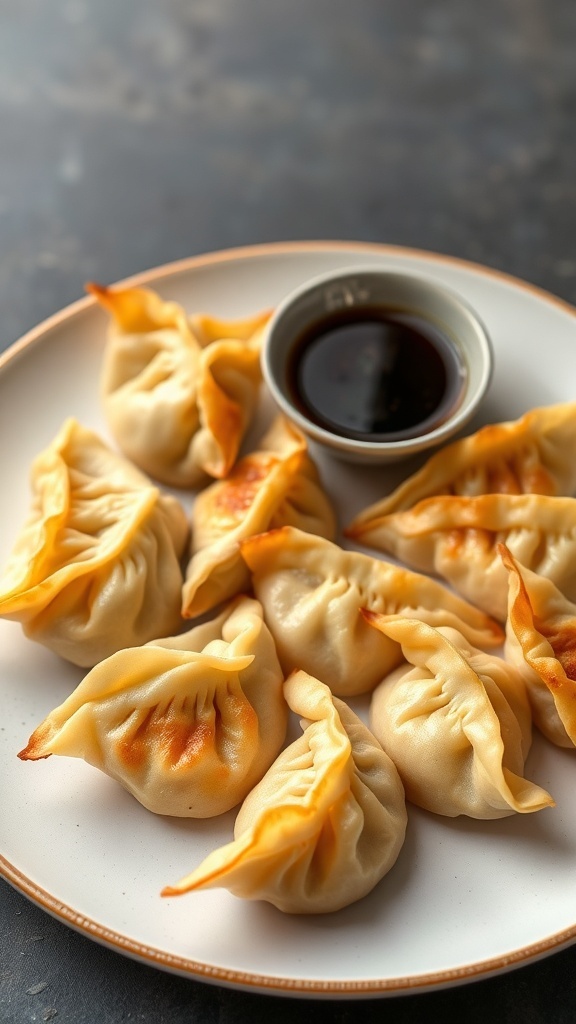
Gyoza dumplings are a delightful treat that brings a taste of Japan right to your kitchen. These little pockets of joy are filled with a savory mixture of meat and vegetables, then pan-fried to perfection. The crispy edges contrast beautifully with the tender filling, making each bite a satisfying experience.
Pair these dumplings with a simple dipping sauce, and you have a dish that’s perfect for sharing or enjoying solo. The sauce typically combines soy sauce, vinegar, and a hint of sesame oil, adding an extra layer of flavor that complements the gyoza perfectly.
Making gyoza is a fun activity, whether you’re cooking alone or with friends. It’s a great way to bond over food and share a delicious meal. Plus, you can customize the filling to suit your taste!
Ingredients
- 1 cup ground pork (or chicken)
- 1 cup finely chopped cabbage
- 1/4 cup chopped green onions
- 1 tablespoon minced garlic
- 1 tablespoon minced ginger
- 2 tablespoons soy sauce
- 1 tablespoon sesame oil
- 1 package gyoza wrappers
- Vegetable oil for frying
Instructions
- Prepare the Filling: In a bowl, mix the ground pork, cabbage, green onions, garlic, ginger, soy sauce, and sesame oil until well combined.
- Fill the Wrappers: Place a small spoonful of the filling in the center of each gyoza wrapper. Moisten the edges with water, fold the wrapper in half, and pinch to seal.
- Cook the Gyoza: Heat a non-stick skillet over medium heat and add a little vegetable oil. Place the gyoza in the skillet and cook until the bottoms are golden brown, about 3-4 minutes.
- Add Water: Carefully add a few tablespoons of water to the skillet and cover immediately. Let the gyoza steam for about 5 minutes until cooked through.
- Make the Dipping Sauce: In a small bowl, mix soy sauce, vinegar, and sesame oil to taste. Serve alongside the gyoza.
Sushi Rolls with Fresh Ingredients
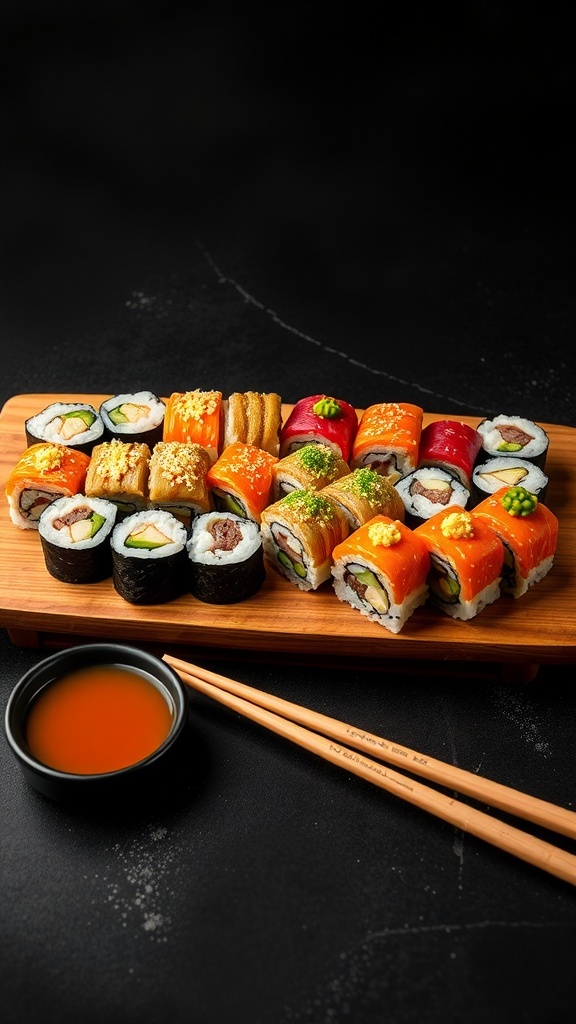
Sushi rolls are a delightful way to enjoy fresh ingredients. They combine flavors and textures in a fun and creative way. The image shows a beautiful assortment of sushi rolls, each with vibrant colors and unique fillings. From classic options like cucumber and avocado to more adventurous choices, there’s something for everyone.
Making sushi at home is easier than you might think. Start with sushi rice, which is sticky and perfect for rolling. Then, choose your favorite fillings. Fresh fish, vegetables, and even fruits can be used. The key is to keep everything fresh and flavorful.
Don’t forget the dipping sauce! Soy sauce is a classic choice, but you can also try spicy mayo or eel sauce for a twist. Grab your chopsticks and enjoy a homemade sushi experience!
Ingredients
- 2 cups sushi rice
- 2 1/2 cups water
- 1/4 cup rice vinegar
- 2 tablespoons sugar
- 1 teaspoon salt
- Nori sheets (seaweed)
- 1 cucumber, julienned
- 1 avocado, sliced
- Fresh fish (like salmon or tuna), sliced
- Sesame seeds (optional)
- Soy sauce for dipping
Instructions
- Rinse the sushi rice under cold water until the water runs clear. Combine the rice and water in a rice cooker and cook according to the manufacturer’s instructions.
- Once cooked, transfer the rice to a large bowl. Mix rice vinegar, sugar, and salt in a small bowl until dissolved, then pour over the rice. Gently fold to combine and let it cool.
- Place a nori sheet on a bamboo sushi mat, shiny side down. Wet your hands to prevent sticking and spread a thin layer of rice over the nori, leaving about an inch at the top edge.
- Add your desired fillings in a line across the center of the rice. Roll the sushi tightly from the bottom, using the mat to help shape it. Seal the edge with a little water.
- Slice the roll into bite-sized pieces and sprinkle with sesame seeds if desired. Serve with soy sauce for dipping.
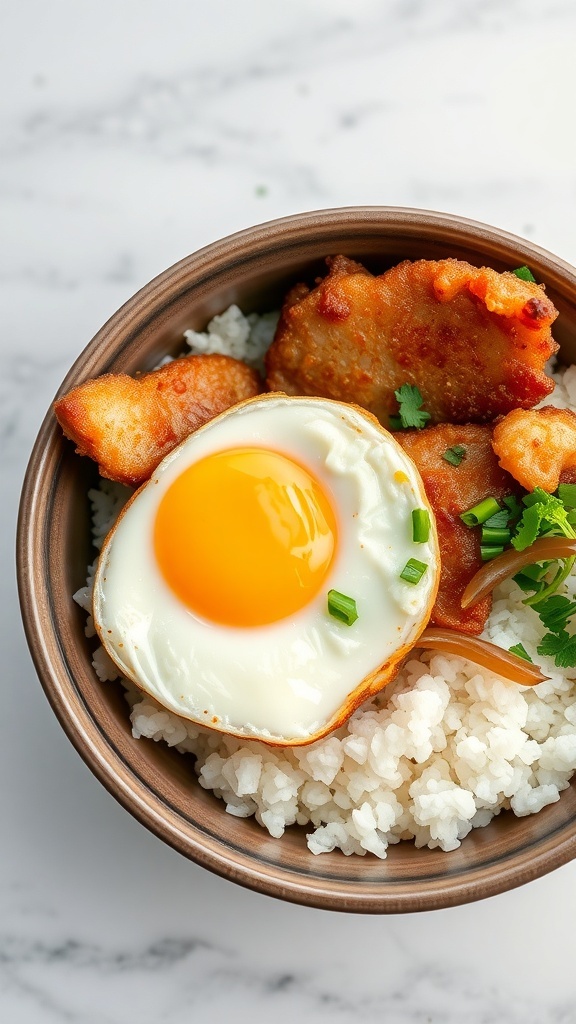
Donburi Rice Bowls with Various Toppings
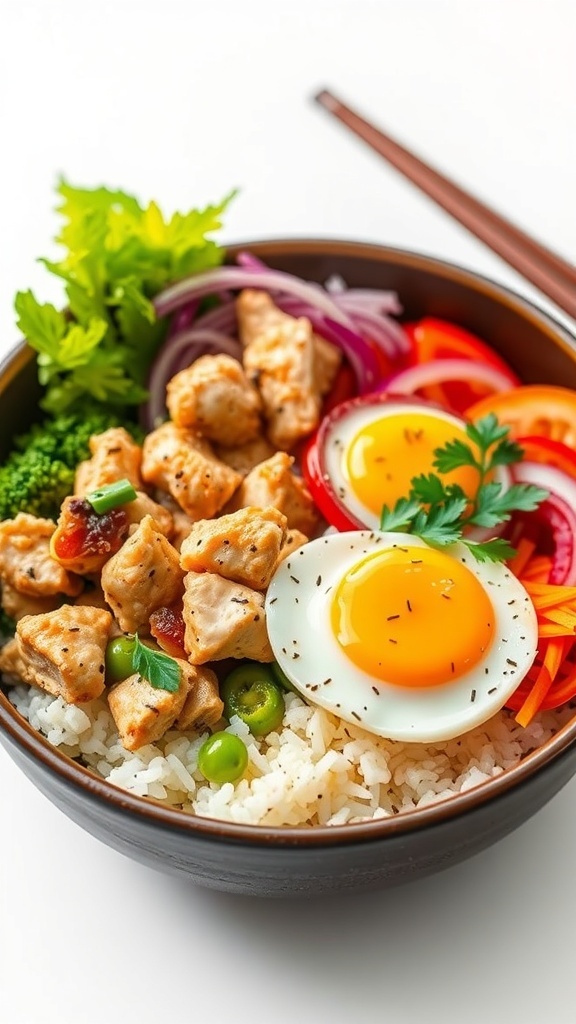
Donburi rice bowls are a delightful way to enjoy a meal in a single bowl. They combine rice with a variety of toppings, making each bite a burst of flavor. The image shows a beautiful donburi bowl filled with fluffy rice, tender chicken, and colorful vegetables. The addition of a perfectly cooked egg on top adds richness and creaminess to the dish.
This dish is not only visually appealing but also customizable. You can use different proteins like beef, pork, or tofu, and mix in your favorite vegetables. The balance of textures and flavors makes donburi a favorite among many.
Let’s get into making your own donburi rice bowl!
Ingredients
- 2 cups cooked rice (white or brown)
- 1 cup chicken breast, diced
- 1 tablespoon soy sauce
- 1 tablespoon mirin (optional)
- 1 teaspoon sesame oil
- 1/2 cup broccoli florets
- 1/2 cup sliced bell peppers
- 1/4 cup sliced onion
- 2 eggs
- Fresh herbs (like parsley or cilantro) for garnish
Instructions
- Cook the Rice: Start by cooking your rice according to package instructions. Set aside once done.
- Prepare the Chicken: In a pan, heat sesame oil over medium heat. Add diced chicken and cook until browned. Stir in soy sauce and mirin, cooking for another 2-3 minutes.
- Cook the Vegetables: In the same pan, add broccoli, bell peppers, and onion. Sauté until they are tender but still crisp.
- Fry the Eggs: In a separate pan, fry the eggs sunny-side up or to your preference.
- Assemble the Bowl: In a bowl, layer the cooked rice, followed by the chicken and vegetables. Top with the fried egg and garnish with fresh herbs.
Matcha Green Tea Cookies
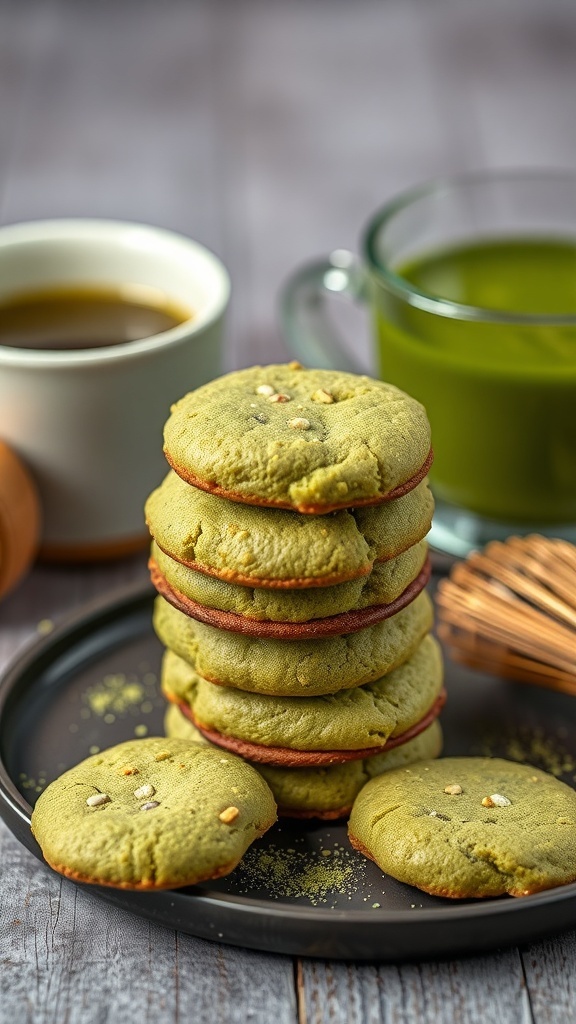
Matcha green tea cookies are a delightful treat that combines the earthy flavor of matcha with a soft, chewy texture. These cookies are not just tasty; they also bring a unique twist to traditional cookie recipes. The vibrant green color of matcha makes these cookies visually appealing, perfect for impressing friends or family.
In the image, you can see a stack of freshly baked matcha cookies, showcasing their lovely green hue. They are placed on a dark plate, accompanied by cups of tea. This setting highlights how well these cookies pair with a warm beverage, making for a cozy snack time.
Making matcha green tea cookies is simple and fun. You’ll enjoy the process as much as the delicious results!
Ingredients
- 1 cup all-purpose flour
- 2 tablespoons matcha green tea powder
- 1/2 teaspoon baking soda
- 1/4 teaspoon salt
- 1/2 cup unsalted butter, softened
- 1/2 cup granulated sugar
- 1/4 cup brown sugar, packed
- 1 large egg
- 1 teaspoon vanilla extract
- 1/2 cup white chocolate chips (optional)
Instructions
- Preheat the Oven: Start by preheating your oven to 350°F (175°C) and lining a baking sheet with parchment paper.
- Mix Dry Ingredients: In a bowl, whisk together the flour, matcha powder, baking soda, and salt. Set this mixture aside.
- Cream Butter and Sugars: In another bowl, beat the softened butter, granulated sugar, and brown sugar until creamy. This should take about 2-3 minutes.
- Add Egg and Vanilla: Mix in the egg and vanilla extract until well combined.
- Combine Mixtures: Gradually add the dry ingredients to the wet mixture, mixing until just combined. If you’re using white chocolate chips, fold them in now.
- Scoop and Bake: Use a cookie scoop to drop dough onto the prepared baking sheet. Bake for 10-12 minutes, or until the edges are lightly golden.
- Cool: Let the cookies cool on the baking sheet for a few minutes before transferring them to a wire rack to cool completely.
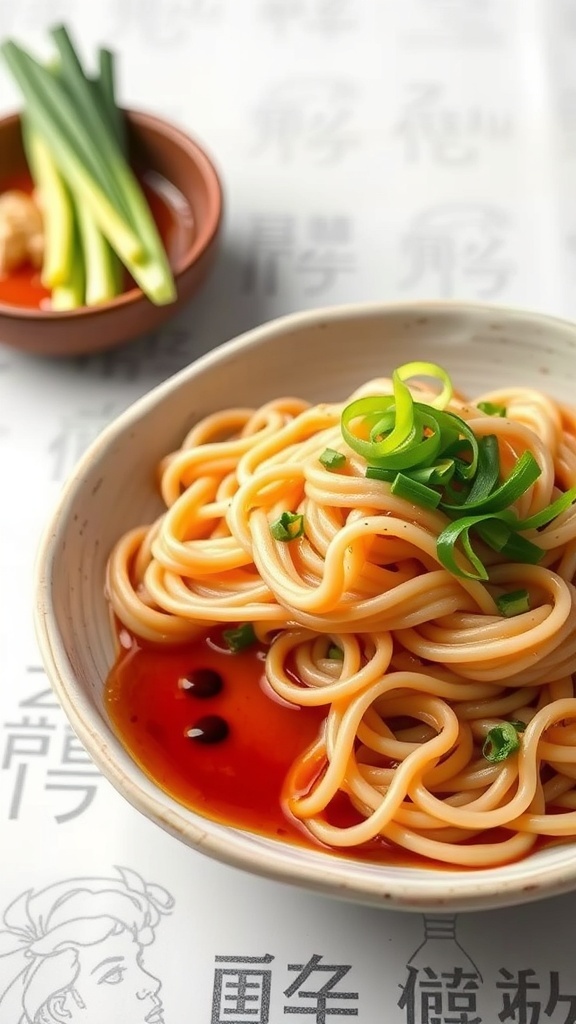
Ramen Noodle Soup with Toppings
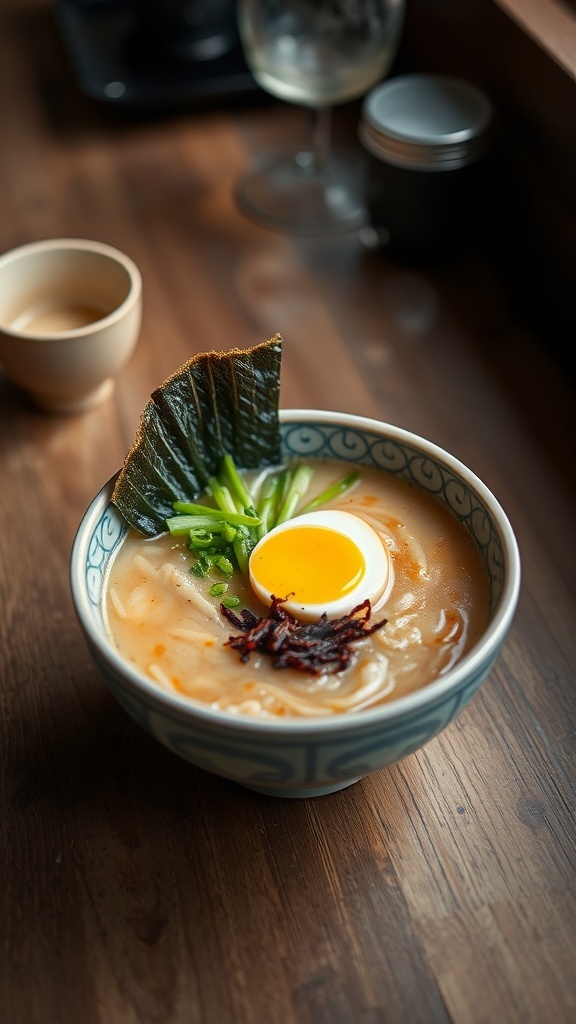
Ramen noodle soup is a comforting dish that warms the soul. The image shows a beautifully presented bowl of ramen, featuring a rich broth, perfectly cooked noodles, and a variety of toppings. The soft-boiled egg adds a creamy texture, while the green onions and seaweed provide freshness and color. This dish is not just a meal; it’s an experience that brings together flavors and textures.
Making ramen at home is easier than you might think. You can customize it with your favorite toppings, making each bowl unique. Whether you prefer a spicy kick or a milder flavor, the options are endless. Let’s dive into a simple recipe that captures the essence of this beloved dish.
Ingredients
- 4 cups chicken or vegetable broth
- 2 packs of ramen noodles
- 2 soft-boiled eggs
- 1 cup sliced green onions
- 1 sheet of nori (seaweed)
- 1 tablespoon soy sauce
- 1 teaspoon sesame oil
- Chili oil (optional, for spice)
- Cooked protein (chicken, pork, or tofu)
Instructions
- Prepare the Broth: In a pot, heat the chicken or vegetable broth over medium heat. Stir in soy sauce and sesame oil. Let it simmer for about 10 minutes to blend the flavors.
- Cook the Noodles: In a separate pot, boil water and cook the ramen noodles according to package instructions. Drain and set aside.
- Assemble the Bowl: Divide the cooked noodles into bowls. Pour the hot broth over the noodles.
- Add Toppings: Halve the soft-boiled eggs and place them on top. Add sliced green onions, nori, and your choice of protein. Drizzle with chili oil if you like it spicy.
- Serve: Enjoy your homemade ramen hot, and feel free to customize it with any additional toppings you love!
Okonomiyaki Savory Pancake
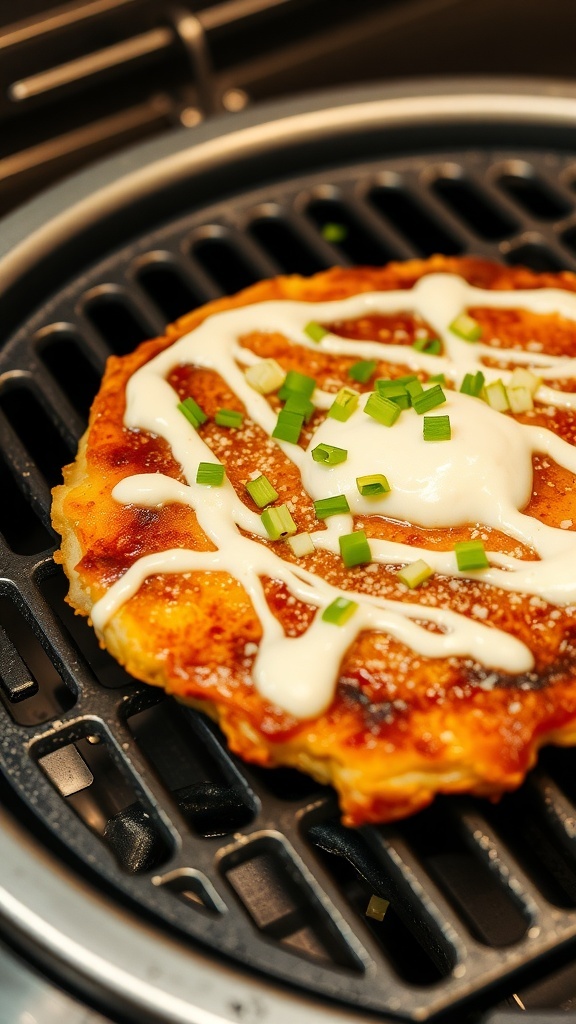
Okonomiyaki is a delightful savory pancake that hails from Japan. This dish is a true crowd-pleaser, combining a variety of ingredients that can be customized to suit your taste. The image showcases a beautifully cooked okonomiyaki, topped with a drizzle of creamy sauce and fresh green onions. The golden-brown crust and fluffy interior make it irresistible.
To make your own okonomiyaki, you’ll need a few key ingredients. The beauty of this recipe is its flexibility. You can add meats, seafood, or even more vegetables based on what you have on hand. It’s a fun dish to prepare with family or friends, allowing everyone to create their own unique version.
Here’s how to whip up this tasty treat:
Ingredients
- 2 cups all-purpose flour
- 1 cup dashi stock (or water)
- 2 large eggs
- 2 cups shredded cabbage
- 1/2 cup chopped green onions
- 1/2 cup cooked and chopped bacon or shrimp (optional)
- Vegetable oil for frying
- Okonomiyaki sauce (for drizzling)
- Mayonnaise (for drizzling)
- Bonito flakes (optional, for garnish)
- Seaweed flakes (optional, for garnish)
Instructions
- Prepare the Batter: In a large bowl, mix the flour and dashi stock until smooth. Add the eggs and stir until well combined.
- Add Vegetables: Fold in the shredded cabbage, green onions, and any additional ingredients like bacon or shrimp.
- Heat the Pan: Heat a non-stick skillet over medium heat and add a little vegetable oil.
- Cook the Pancake: Pour a ladleful of the batter into the skillet, shaping it into a round pancake. Cook for about 4-5 minutes on one side until golden brown, then flip and cook for another 4-5 minutes.
- Serve: Once cooked, transfer the pancake to a plate. Drizzle with okonomiyaki sauce and mayonnaise. Sprinkle bonito and seaweed flakes on top if desired.
Katsudon Pork Cutlet Rice Bowl
Katsudon is a beloved Japanese dish that combines crispy pork cutlet with fluffy rice and a delicious egg topping. This dish is perfect for a cozy dinner or a satisfying lunch. The image showcases a bowl filled with tender pork cutlet, a perfectly fried egg, and a generous serving of rice, all garnished with fresh herbs. It’s a feast for the eyes and the taste buds!
The star of this dish is the pork cutlet, which is breaded and fried until golden brown. It’s then simmered with a savory sauce that adds depth and flavor. The egg is cooked just right, with a runny yolk that adds creaminess to each bite. This combination makes Katsudon a comforting meal that warms you from the inside out.
Making Katsudon at home is easier than you might think. With just a few ingredients and simple steps, you can whip up this delicious dish in no time. Let’s get into the recipe!
Ingredients
- 2 cups cooked white rice
- 1 pork loin cutlet (about 1/2 inch thick)
- 1/2 cup panko breadcrumbs
- 1 egg (for the cutlet)
- 1 egg (for topping)
- 1/4 cup flour
- 1/4 cup dashi broth
- 2 tablespoons soy sauce
- 1 tablespoon mirin
- 1 tablespoon sugar
- Vegetable oil (for frying)
- Chopped green onions (for garnish)
Instructions
- Prepare the Cutlet: Season the pork cutlet with salt and pepper. Dredge it in flour, dip it in beaten egg, and coat with panko breadcrumbs.
- Fry the Cutlet: Heat vegetable oil in a pan over medium heat. Fry the cutlet until golden brown on both sides, about 4-5 minutes per side. Remove and let it rest.
- Make the Sauce: In the same pan, add dashi broth, soy sauce, mirin, and sugar. Bring to a simmer.
- Cook the Egg: Slice the cutlet into strips and place it back in the pan. Pour the second beaten egg over the cutlet. Cover and cook until the egg is set.
- Assemble the Bowl: Serve the cooked rice in a bowl. Top with the pork cutlet and egg mixture. Garnish with chopped green onions.
Yaki Udon Stir-Fried Noodles
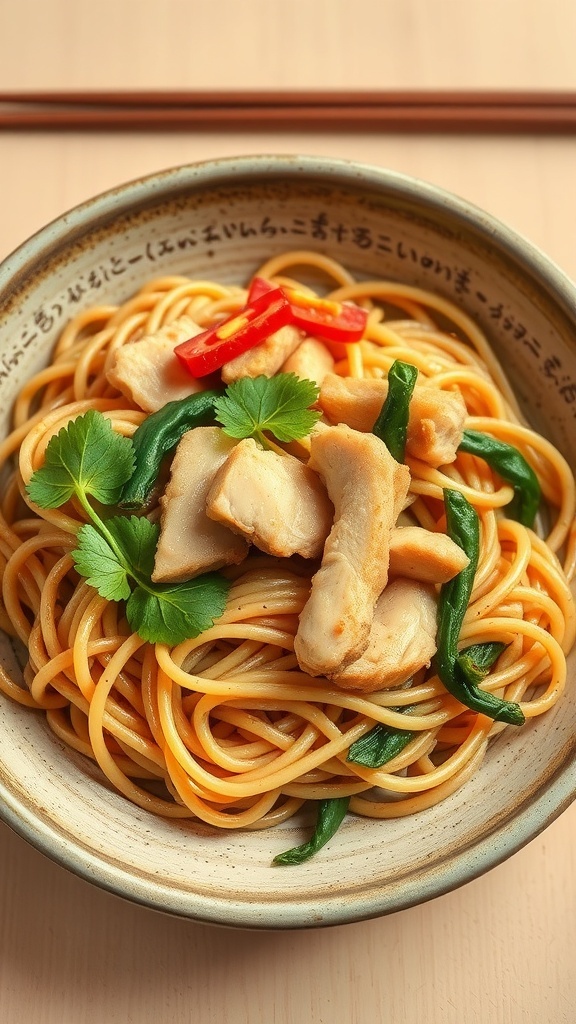
Yaki Udon is a delightful dish that showcases thick, chewy noodles stir-fried with a mix of fresh ingredients. The image captures a vibrant bowl of Yaki Udon, featuring tender chicken pieces, crisp green beans, and a pop of red chili for a touch of heat. The dish is garnished with fresh cilantro, adding a burst of color and flavor.
This recipe is perfect for a quick weeknight dinner or a cozy meal with friends. The combination of savory soy sauce and the natural sweetness of the vegetables creates a delicious harmony that everyone will enjoy.
Ingredients
- 200g udon noodles
- 200g chicken breast, sliced
- 1 cup green beans, trimmed
- 1 red chili, sliced
- 2 tablespoons soy sauce
- 1 tablespoon sesame oil
- 2 cloves garlic, minced
- 1 tablespoon ginger, minced
- Fresh cilantro for garnish
Instructions
- Cook the Noodles: Boil the udon noodles according to package instructions. Drain and set aside.
- Stir-Fry Chicken: In a large pan, heat sesame oil over medium heat. Add sliced chicken and cook until browned and cooked through.
- Add Vegetables: Stir in minced garlic, ginger, and green beans. Cook for about 3-4 minutes until the beans are tender.
- Combine: Add the cooked udon noodles and soy sauce to the pan. Toss everything together until well combined and heated through.
- Serve: Plate the Yaki Udon and top with sliced red chili and fresh cilantro before serving.
Nasu Dengaku Grilled Eggplant
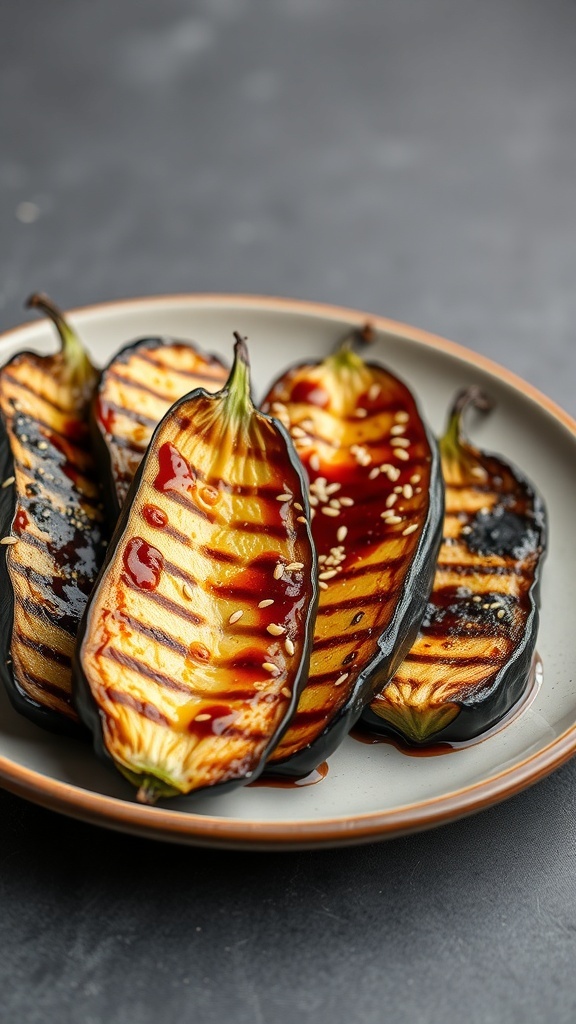
Nasu Dengaku is a delightful Japanese dish featuring grilled eggplant topped with a sweet miso glaze. The image shows perfectly grilled eggplant slices, their skin slightly charred and glistening with a rich, glossy sauce. The contrast between the dark skin and the bright glaze makes it visually appealing.
This dish is not just about looks; it’s packed with flavor. The miso glaze adds a sweet and savory touch that complements the natural taste of the eggplant. It’s a great option for a light meal or as a side dish at your next gathering.
Making Nasu Dengaku is simple and rewarding. You’ll love how easy it is to prepare this dish at home!
Ingredients
- 2 medium eggplants
- 3 tablespoons miso paste
- 2 tablespoons mirin
- 1 tablespoon sugar
- 1 tablespoon soy sauce
- 1 teaspoon sesame oil
- Sesame seeds for garnish
Instructions
- Preheat your grill or oven to medium-high heat.
- Slice the eggplants in half lengthwise. Score the flesh in a crisscross pattern to help the glaze soak in.
- In a bowl, mix the miso paste, mirin, sugar, soy sauce, and sesame oil until smooth.
- Brush the miso mixture generously over the cut sides of the eggplants.
- Place the eggplants on the grill or in the oven, cut side up. Grill for about 10-15 minutes, or until the eggplants are tender and slightly charred.
- Remove from heat and sprinkle with sesame seeds before serving.
Chawanmushi Savory Egg Custard
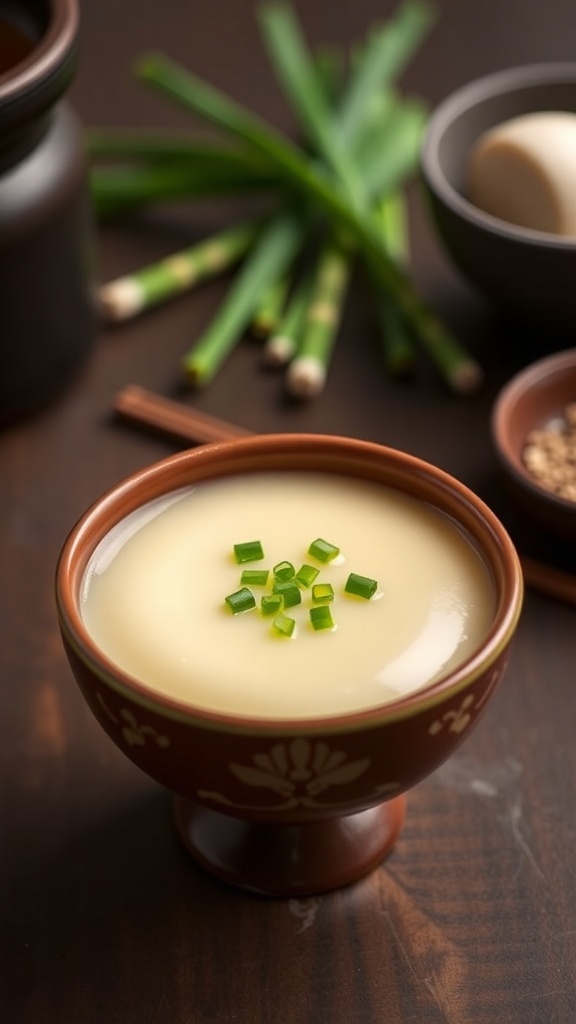
Chawanmushi is a delightful Japanese dish that showcases the beauty of simplicity. This savory egg custard is smooth, creamy, and often filled with various ingredients like shrimp, chicken, or vegetables. The image captures a small bowl of chawanmushi, topped with fresh green onions, resting on a newspaper. The soft texture and subtle flavors make it a comforting dish, perfect for any meal.
Making chawanmushi at home is easier than you might think. You can customize it with your favorite fillings, making it a versatile option for any occasion.
Ingredients
- 4 large eggs
- 2 cups dashi stock
- 1 tablespoon soy sauce
- 1 teaspoon mirin
- Salt to taste
- 1/2 cup cooked shrimp, chopped
- 1/2 cup chicken, cooked and diced
- 1/4 cup shiitake mushrooms, sliced
- Chopped green onions for garnish
Instructions
- Prepare the Mixture: In a bowl, whisk together the eggs, dashi stock, soy sauce, mirin, and a pinch of salt until well combined.
- Add Fillings: Divide the shrimp, chicken, and mushrooms among small cups or ramekins. Pour the egg mixture over the fillings, leaving some space at the top.
- Steam: Place the cups in a steamer basket over simmering water. Cover and steam for about 15-20 minutes, or until the custard is set.
- Garnish: Once cooked, remove from the steamer and let cool slightly. Top with chopped green onions before serving.
Japanese Curry Rice with Chicken
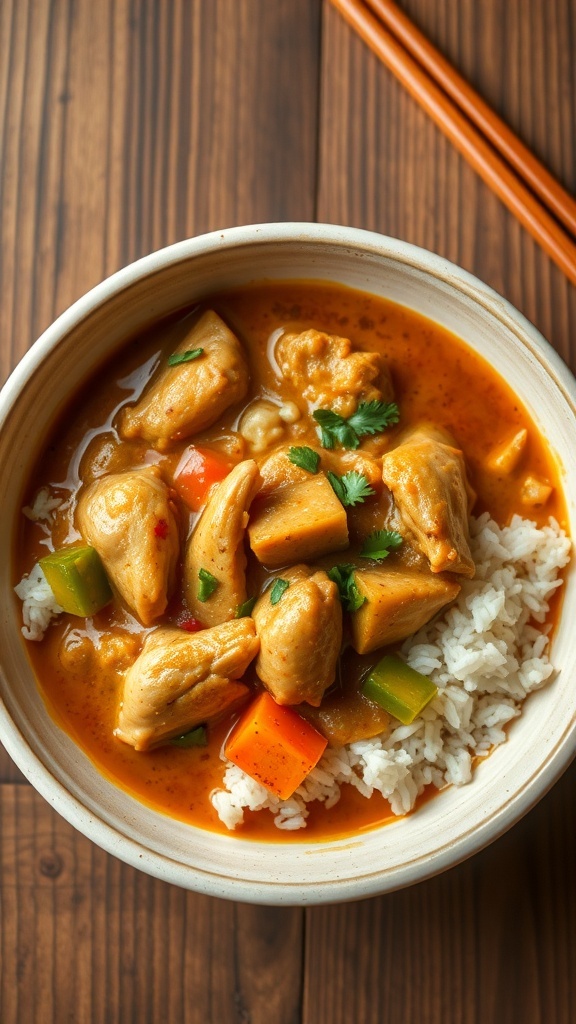
Japanese curry rice is a comforting dish that brings warmth and flavor to any meal. The image showcases a bowl filled with tender chicken pieces swimming in a rich, savory curry sauce, served over fluffy white rice. Colorful vegetables add a nice touch, making the dish not only delicious but visually appealing.
This dish is a staple in many Japanese households. It’s easy to prepare and perfect for a family dinner. The curry sauce is mildly spiced, making it suitable for everyone, including kids. Plus, you can customize it with your favorite vegetables!
To make this delightful dish, you’ll need some basic ingredients. Let’s get cooking!
Ingredients
- 1 lb chicken breast, cut into bite-sized pieces
- 1 onion, chopped
- 2 carrots, diced
- 1 potato, diced
- 1 cup green bell pepper, chopped
- 2 tablespoons vegetable oil
- 4 cups water
- 1 package Japanese curry roux (about 3.5 oz)
- 2 cups cooked white rice
- Salt and pepper to taste
Instructions
- Heat the vegetable oil in a large pot over medium heat. Add the chopped onion and sauté until translucent.
- Add the chicken pieces and cook until they are no longer pink.
- Stir in the diced carrots, potatoes, and green bell pepper. Cook for a few minutes until they start to soften.
- Pour in the water and bring to a boil. Reduce the heat and let it simmer for about 15 minutes.
- Add the curry roux to the pot, stirring until it dissolves completely. Let it simmer for another 10 minutes until the sauce thickens.
- Season with salt and pepper to taste.
- Serve the curry over cooked white rice and enjoy!
Tempura Vegetables and Shrimp
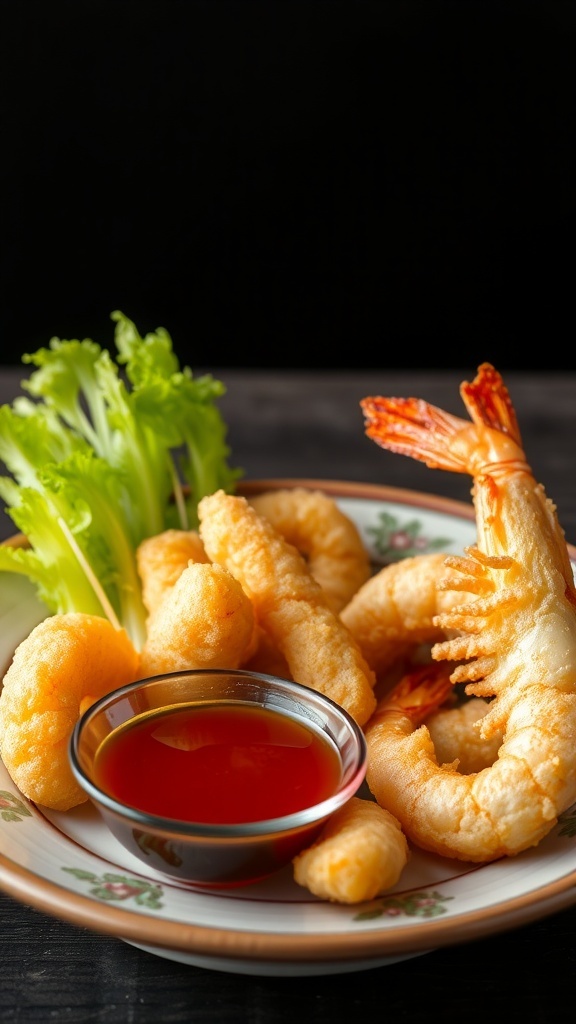
Tempura is a classic Japanese dish that features lightly battered and fried vegetables and shrimp. The image shows a delightful plate of tempura, showcasing golden-brown shrimp alongside crispy vegetable pieces. The vibrant colors and textures make it an appealing dish for any meal.
Making tempura is all about achieving that perfect crunch. The batter is typically made from cold water and flour, which helps create a light and airy coating. You can use a variety of vegetables like sweet potatoes, bell peppers, and zucchini. The shrimp adds a nice protein element, making it a well-rounded dish.
This dish is often served with a dipping sauce, usually a mix of soy sauce and mirin, which complements the flavors beautifully. Tempura is not only delicious but also fun to make, making it a great choice for gatherings or family dinners.
Ingredients
- 1 cup all-purpose flour
- 1 cup ice-cold water
- 1 large egg
- 1/2 teaspoon baking powder
- 1 cup shrimp, peeled and deveined
- 1 cup assorted vegetables (sweet potatoes, bell peppers, zucchini)
- Vegetable oil for frying
- Soy sauce for dipping
Instructions
- Prepare the Batter: In a bowl, whisk together the flour, ice-cold water, egg, and baking powder until just combined. Be careful not to overmix; some lumps are okay.
- Heat the Oil: In a deep pan, heat vegetable oil to 350°F (175°C). You need enough oil to submerge the tempura.
- Coat the Ingredients: Dip the shrimp and vegetables into the batter, allowing excess to drip off.
- Fry: Carefully place the battered items into the hot oil. Fry in batches to avoid overcrowding. Cook for about 2-3 minutes or until golden brown.
- Drain: Remove the tempura from the oil and place it on paper towels to drain excess oil.
- Serve: Arrange the tempura on a plate and serve with soy sauce for dipping.
Chirashi Sushi Bowl
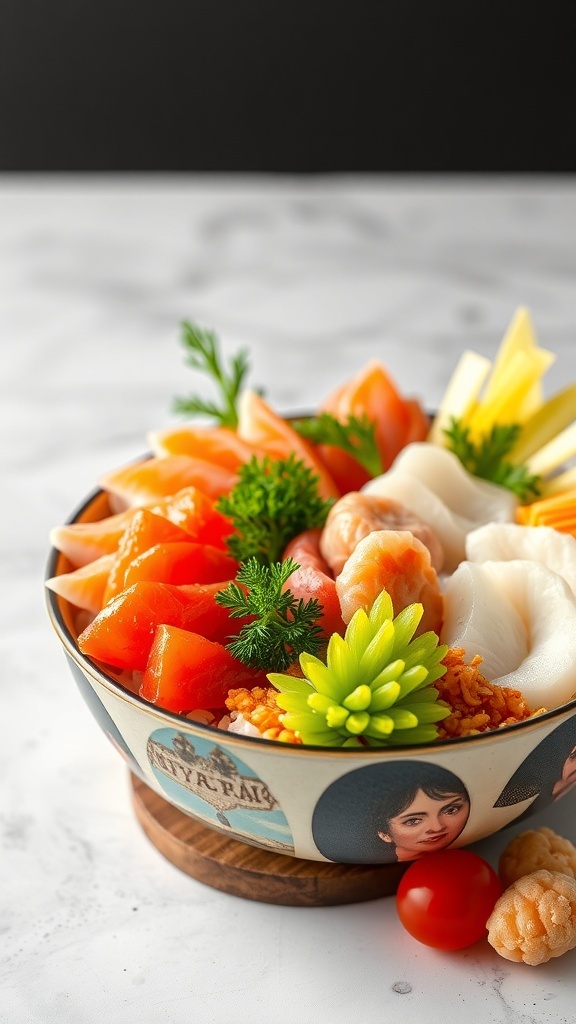
Chirashi sushi, or scattered sushi, is a delightful way to enjoy a variety of fresh ingredients in one bowl. This dish is colorful and visually appealing, making it perfect for any occasion. The image shows a beautifully arranged bowl filled with vibrant slices of fish, vegetables, and garnishes, all resting on a bed of sushi rice.
The base of chirashi sushi is typically vinegared rice, which provides a slightly sweet and tangy flavor. On top, you can find an assortment of sashimi, such as salmon, shrimp, and other seafood, along with fresh vegetables like cucumber and radish. The bright colors and textures make each bite exciting!
Making a chirashi sushi bowl at home is simple and fun. You can customize it with your favorite toppings, making it a versatile dish for everyone. Whether you’re hosting a dinner party or enjoying a quiet meal, chirashi sushi is sure to impress.
Ingredients
- 2 cups sushi rice
- 2 1/2 cups water
- 1/4 cup rice vinegar
- 2 tablespoons sugar
- 1 teaspoon salt
- 200g sashimi-grade salmon, sliced
- 100g cooked shrimp
- 100g white fish, sliced
- 1/2 cucumber, julienned
- 1/2 avocado, sliced
- Pickled ginger, for garnish
- Sesame seeds, for garnish
- Fresh herbs (like shiso or parsley), for garnish
Instructions
- Rinse the sushi rice under cold water until the water runs clear. Drain well.
- In a rice cooker or pot, combine the rinsed rice and water. Cook according to the rice cooker’s instructions or bring to a boil, then reduce heat and simmer for about 20 minutes until the water is absorbed.
- While the rice cooks, mix rice vinegar, sugar, and salt in a small bowl until dissolved. Once the rice is done, transfer it to a large bowl and gently fold in the vinegar mixture. Let it cool to room temperature.
- Once the rice is cool, layer it in a bowl. Arrange the sashimi, shrimp, cucumber, and avocado on top of the rice.
- Garnish with pickled ginger, sesame seeds, and fresh herbs. Serve immediately and enjoy your chirashi sushi bowl!
Takoyaki Octopus Balls
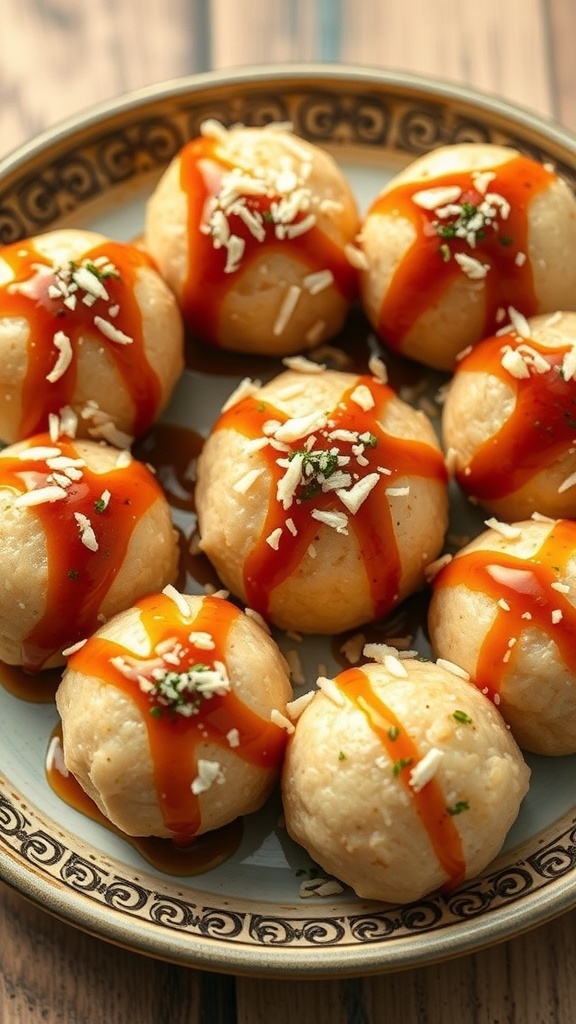
Takoyaki is a popular Japanese street food that brings a burst of flavor in every bite. These delightful octopus balls are crispy on the outside and soft on the inside. They are typically filled with diced octopus, green onions, and pickled ginger, making them a savory treat loved by many.
In the image, you can see beautifully plated takoyaki balls, drizzled with a rich sauce and topped with bonito flakes and green onions. The presentation is inviting, making it hard to resist trying one!
Making takoyaki at home is easier than you might think. With a few simple ingredients and a takoyaki pan, you can whip up a batch that will impress your friends and family.
Ingredients
- 1 cup all-purpose flour
- 1 1/2 cups dashi stock
- 2 large eggs
- 1/2 cup cooked octopus, diced
- 1/4 cup green onions, chopped
- 1/4 cup pickled ginger, chopped
- Oil for cooking
- Takoyaki sauce (for drizzling)
- Mayonnaise (for drizzling)
- Bonito flakes (for topping)
- Chopped green onions (for garnish)
Instructions
- Prepare the Batter: In a bowl, mix flour and dashi stock until smooth. Add eggs and mix well.
- Heat the Pan: Preheat your takoyaki pan over medium heat and lightly oil each mold.
- Pour the Batter: Fill each mold with batter, about halfway full.
- Add Fillings: Place diced octopus, green onions, and pickled ginger into each mold.
- Cover with Batter: Pour more batter over the fillings until the molds are full.
- Cook: Let them cook for about 3-4 minutes. Use a skewer to turn them over when the bottom is golden brown.
- Finish Cooking: Continue to cook, turning occasionally, until all sides are golden and crispy.
- Serve: Remove from the pan, drizzle with takoyaki sauce and mayonnaise, and sprinkle with bonito flakes and green onions.
Zaru Soba Cold Buckwheat Noodles
Zaru Soba is a refreshing dish that’s perfect for hot days. This Japanese cold noodle dish features buckwheat noodles served chilled, often accompanied by a dipping sauce. The image showcases a bowl of perfectly cooked soba, garnished with green onions, and served with a small dish of dipping sauce. The vibrant colors and simple presentation make it not only delicious but also visually appealing.
To prepare Zaru Soba, you’ll need a few key ingredients. The buckwheat noodles are the star of the dish, providing a nutty flavor and chewy texture. The dipping sauce, typically made from soy sauce, mirin, and dashi, adds a savory touch that complements the noodles beautifully. Fresh green onions and wasabi can be added for extra flavor.
Ingredients
- 200g soba noodles
- 1/4 cup soy sauce
- 2 tablespoons mirin
- 1/4 cup dashi stock
- 2 green onions, finely chopped
- Wasabi (optional)
- Ice water (for chilling)
Instructions
- Cook the Noodles: Bring a pot of water to a boil. Add the soba noodles and cook according to package instructions, usually about 4-5 minutes.
- Chill the Noodles: Once cooked, drain the noodles and rinse them under cold water to stop the cooking process. Place them in a bowl of ice water for a few minutes.
- Prepare the Dipping Sauce: In a small bowl, mix together the soy sauce, mirin, and dashi stock. Adjust the flavors to your liking.
- Serve: Drain the noodles and place them on a serving plate. Garnish with chopped green onions. Serve with the dipping sauce on the side and a small amount of wasabi if desired.
Daifuku Mochi with Sweet Fillings
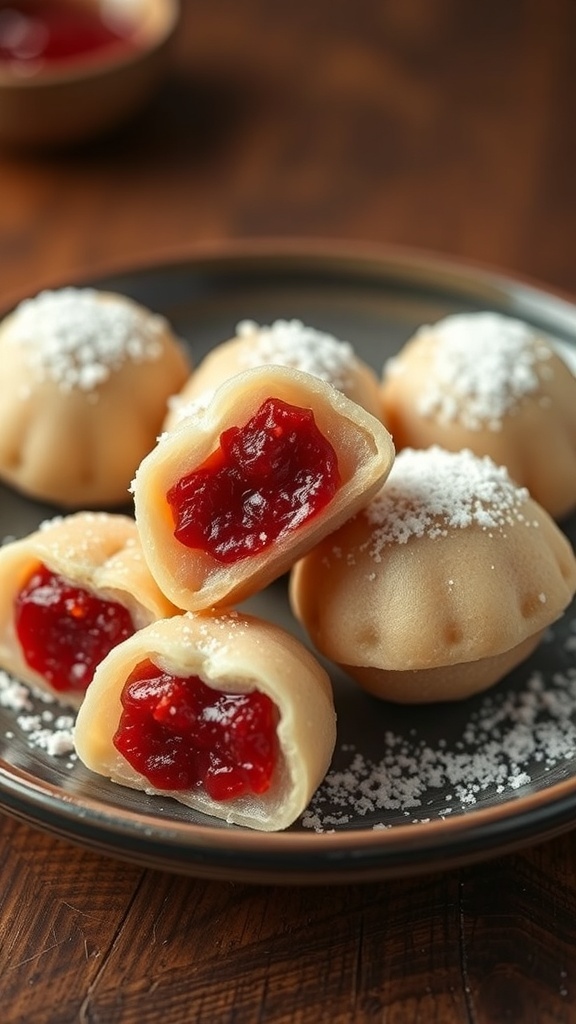
Daifuku mochi is a delightful Japanese treat that combines chewy rice cake with sweet fillings. The image shows beautifully crafted daifuku, dusted with powdered sugar and revealing a vibrant red filling inside. This treat is not just a feast for the eyes; it’s also a burst of flavor that can brighten any day.
Making daifuku at home is a fun and rewarding experience. You can choose different fillings, like sweet red bean paste or fresh fruit, to suit your taste. The soft, chewy texture of the mochi pairs perfectly with the sweetness of the filling, making each bite a little piece of heaven.
Here’s how you can create your own delicious daifuku mochi:
Ingredients
- 1 cup glutinous rice flour
- 1/4 cup sugar
- 1/2 cup water
- 1/2 cup sweet red bean paste (or your choice of filling)
- Potato starch (for dusting)
- Powdered sugar (for dusting)
Instructions
- Mix the glutinous rice flour and sugar in a microwave-safe bowl. Gradually add water and stir until smooth.
- Cover the bowl with plastic wrap and microwave for 1 minute. Stir, then microwave for another minute. Stir again and microwave for an additional 30 seconds until the mixture is sticky.
- Dust a clean surface with potato starch. Transfer the mochi mixture onto the surface and let it cool slightly.
- Divide the mochi into small pieces. Flatten each piece and place a spoonful of filling in the center.
- Wrap the mochi around the filling and pinch to seal. Roll it gently in your hands to form a ball.
- Dust with powdered sugar to prevent sticking. Serve and enjoy your homemade daifuku!
Yaki Onigiri Grilled Rice Balls
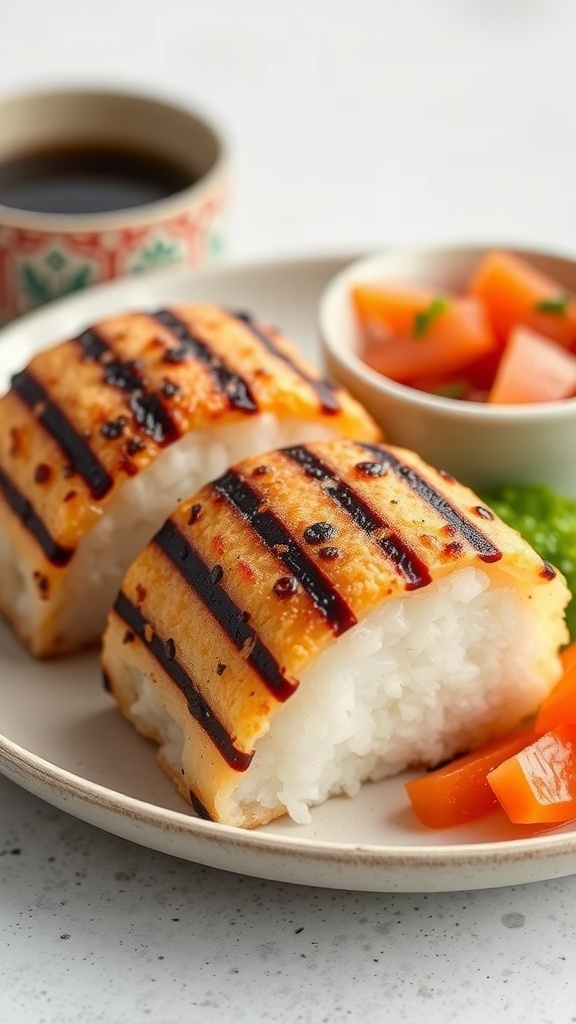
Yaki Onigiri are grilled rice balls that bring a delightful twist to traditional rice dishes. These tasty treats are crispy on the outside and soft on the inside, making them a perfect snack or side dish. The image showcases beautifully grilled rice balls, marked with charred lines, served alongside a small bowl of soy sauce and fresh vegetables. The combination of flavors and textures makes Yaki Onigiri a favorite among many.
Making Yaki Onigiri is simple and fun. You can customize them with different fillings or toppings, like grilled salmon or pickled vegetables. They are great for picnics or as a quick meal at home. Let’s dive into how to make these delicious rice balls!
Ingredients
- 2 cups short-grain rice
- 2 1/2 cups water
- 1 teaspoon salt
- 1 tablespoon soy sauce
- 1 tablespoon sesame oil
- Optional fillings (e.g., grilled salmon, pickled plum, or seaweed)
- Extra soy sauce for serving
Instructions
- Cook the Rice: Rinse the rice under cold water until the water runs clear. Combine the rice and water in a rice cooker or pot. Cook according to the rice cooker instructions or bring to a boil, then cover and simmer for 15-20 minutes until the water is absorbed.
- Season the Rice: Once cooked, let the rice cool slightly. Stir in salt and soy sauce. If using fillings, mix them in at this stage.
- Shape the Rice Balls: Wet your hands to prevent sticking. Take a handful of rice and shape it into a triangle or ball. Make a small indentation in the center for the filling, if using, and seal it up.
- Grill the Rice Balls: Heat sesame oil in a skillet over medium heat. Place the rice balls in the skillet and grill for about 3-4 minutes on each side until golden brown and crispy.
- Serve: Remove from heat and serve warm with extra soy sauce for dipping. Enjoy your homemade Yaki Onigiri!
Shabu-Shabu Hot Pot
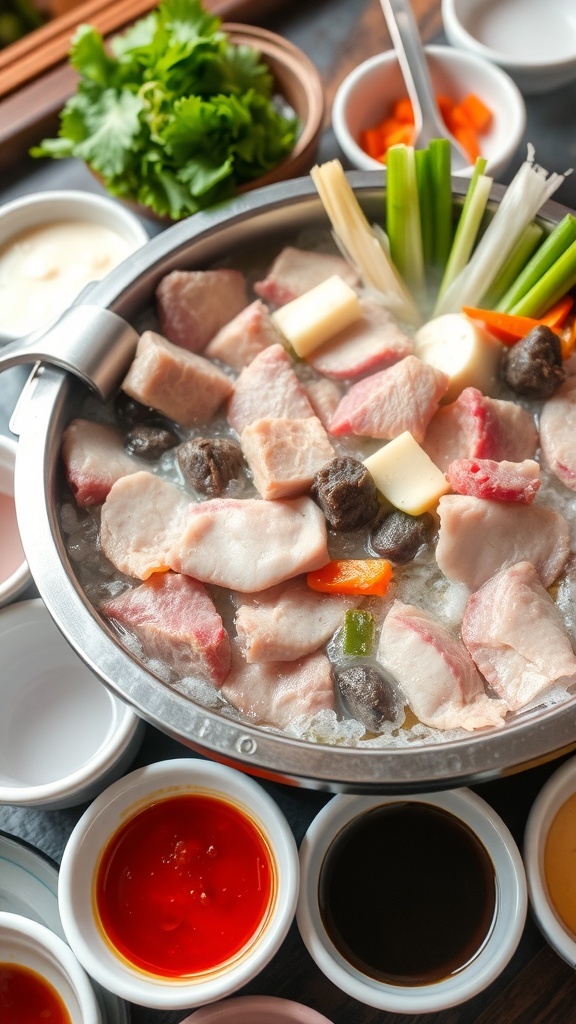
Shabu-shabu is a delightful Japanese hot pot dish that brings friends and family together. The image showcases a bubbling pot filled with thinly sliced meats, fresh vegetables, and a variety of dipping sauces. It’s a fun and interactive meal where everyone can cook their ingredients to their liking.
The key to a great shabu-shabu experience is the quality of the ingredients. Tender cuts of beef or pork are usually the stars of the show. You can also add vegetables like mushrooms, carrots, and leafy greens for a colorful and nutritious meal. The dipping sauces, often made from soy sauce, sesame, or ponzu, add a burst of flavor that enhances each bite.
Gather your loved ones around the table, and let the cooking begin! Each person can dip their meat and veggies into the hot broth, cooking them just right. It’s a wonderful way to bond over a delicious meal.
Ingredients
- 200g thinly sliced beef or pork
- 1 cup napa cabbage, chopped
- 1 cup shiitake mushrooms, sliced
- 1 cup carrots, julienned
- 1 cup green onions, cut into 2-inch pieces
- 4 cups dashi broth or water
- Sesame sauce and ponzu sauce for dipping
Instructions
- Prepare the Broth: In a pot, bring the dashi broth or water to a gentle simmer.
- Arrange Ingredients: While the broth heats, arrange the sliced meat and vegetables on a platter.
- Cook the Ingredients: Once the broth is simmering, dip the meat and vegetables into the pot for a few seconds until cooked through.
- Serve with Dipping Sauces: Enjoy the cooked ingredients with sesame sauce or ponzu sauce for added flavor.
- Repeat: Continue cooking and dipping until everyone is satisfied!