Valentine’s cake is the perfect sweet treat to celebrate love and affection, whether it’s for a partner, friend, or family member. With its charming designs and delicious flavors, this cake is all about sharing joy and making special moments even more memorable. Get ready to bring some love to your dessert table!
Red Velvet Heart Cake

Red velvet cake is a classic choice for Valentine’s Day. Its rich, deep red color symbolizes love and passion, making it perfect for the occasion. This heart-shaped cake is not just a treat for the eyes; it’s also a delight for the taste buds. The combination of cocoa and buttermilk gives it a unique flavor that pairs beautifully with cream cheese frosting.
The cake is often adorned with beautiful decorations, like fresh flowers or sprinkles, adding a touch of elegance. Imagine serving this stunning cake at a romantic dinner or a fun gathering with friends. It’s sure to impress everyone!
Ingredients
- 2 1/2 cups all-purpose flour
- 1 1/2 cups granulated sugar
- 1 teaspoon baking soda
- 1 teaspoon salt
- 1 teaspoon cocoa powder
- 1 1/2 cups vegetable oil
- 1 cup buttermilk, room temperature
- 2 large eggs, room temperature
- 2 tablespoons red food coloring
- 1 teaspoon vanilla extract
- 1 teaspoon white vinegar
- 8 oz cream cheese, softened
- 1/2 cup unsalted butter, softened
- 4 cups powdered sugar
- 1 teaspoon vanilla extract (for frosting)
Instructions
- Preheat the oven to 350°F (175°C). Grease and flour two heart-shaped cake pans.
- In a large bowl, mix flour, sugar, baking soda, salt, and cocoa powder.
- In another bowl, combine oil, buttermilk, eggs, food coloring, vanilla, and vinegar. Mix well.
- Gradually add the wet ingredients to the dry ingredients, mixing until just combined.
- Pour the batter evenly into the prepared pans. Bake for 25-30 minutes, or until a toothpick comes out clean.
- Let the cakes cool in the pans for 10 minutes, then transfer to a wire rack to cool completely.
- For the frosting, beat together cream cheese and butter until smooth. Gradually add powdered sugar and vanilla, mixing until creamy.
- Once the cakes are cool, frost the top of one layer, place the second layer on top, and frost the top and sides of the cake.
- Decorate with fresh flowers or sprinkles as desired. Slice and enjoy your beautiful red velvet heart cake!
Chocolate Ganache Drip Cake
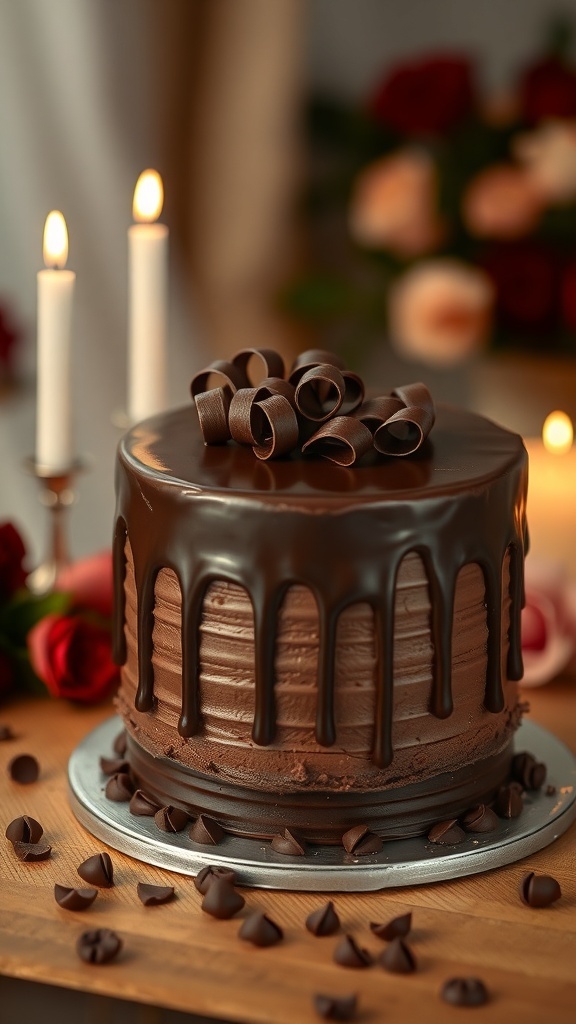
This Chocolate Ganache Drip Cake is a showstopper for any Valentine’s celebration. The rich, glossy ganache drips down the sides, creating a stunning visual that’s hard to resist. Topped with elegant chocolate curls and surrounded by romantic roses, it’s perfect for sharing with someone special.
The cake itself is moist and chocolatey, making each bite a delight. Whether you’re celebrating a special occasion or just treating yourself, this cake is sure to impress. Pair it with candles and flowers for a cozy, intimate setting.
Ingredients
- 1 ¾ cups all-purpose flour
- 2 cups granulated sugar
- ¾ cup unsweetened cocoa powder
- 1 ½ teaspoons baking powder
- 1 ½ teaspoons baking soda
- 1 teaspoon salt
- 2 large eggs
- 1 cup whole milk
- ½ cup vegetable oil
- 2 teaspoons vanilla extract
- 1 cup boiling water
- 1 cup heavy cream
- 8 ounces semi-sweet chocolate, chopped
- Chocolate curls for decoration
Instructions
- Preheat your oven to 350°F (175°C). Grease and flour two 9-inch round cake pans.
- In a large bowl, mix flour, sugar, cocoa powder, baking powder, baking soda, and salt. Add eggs, milk, oil, and vanilla. Beat on medium speed for 2 minutes. Stir in boiling water (the batter will be thin).
- Pour the batter evenly into the prepared pans. Bake for 30-35 minutes or until a toothpick comes out clean. Let cool in the pans for 10 minutes, then transfer to wire racks to cool completely.
- For the ganache, heat the heavy cream in a saucepan until it just begins to simmer. Remove from heat and add the chopped chocolate. Let it sit for a few minutes, then stir until smooth.
- Once the cakes are cool, place one layer on a serving plate. Spread a layer of ganache on top. Place the second layer on top and pour the remaining ganache over the cake, allowing it to drip down the sides.
- Decorate with chocolate curls and serve with love!
Chocolate Strawberry Layer Cake
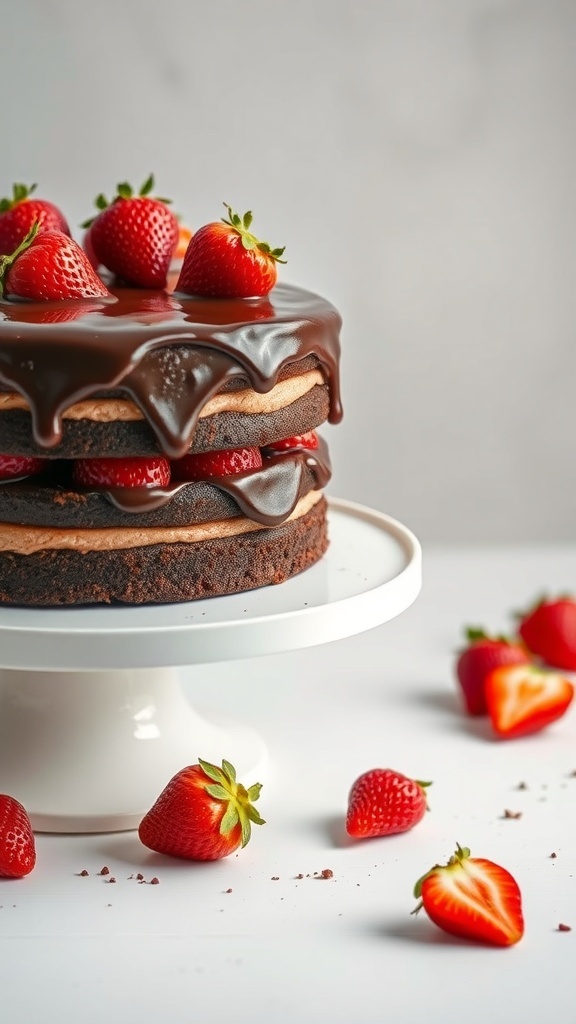
This Chocolate Strawberry Layer Cake is a delightful treat perfect for Valentine’s Day. The rich chocolate layers are complemented by fresh strawberries, making it a sweet way to celebrate love. The glossy chocolate ganache on top adds a touch of elegance, while the juicy strawberries provide a refreshing contrast.
Each slice reveals layers of moist chocolate cake, creamy filling, and vibrant strawberries. It’s a cake that not only looks stunning but also tastes incredible. Whether you’re making it for a special someone or treating yourself, this cake is sure to impress.
Ingredients
- 1 ¾ cups all-purpose flour
- 1 ¾ cups granulated sugar
- ¾ cup unsweetened cocoa powder
- 1 ½ teaspoons baking powder
- 1 ½ teaspoons baking soda
- 1 teaspoon salt
- 2 large eggs
- 1 cup whole milk
- ½ cup vegetable oil
- 2 teaspoons vanilla extract
- 1 cup boiling water
- 1 cup heavy cream
- 8 ounces semi-sweet chocolate, chopped
- 2 cups fresh strawberries, sliced
Instructions
- Preheat the oven to 350°F (175°C). Grease and flour two 9-inch round cake pans.
- In a large bowl, mix flour, sugar, cocoa powder, baking powder, baking soda, and salt. Add eggs, milk, oil, and vanilla. Beat on medium speed for 2 minutes. Stir in boiling water until well combined.
- Pour the batter evenly into prepared pans. Bake for 30-35 minutes or until a toothpick comes out clean. Let cool for 10 minutes before transferring to wire racks.
- For the ganache, heat heavy cream in a saucepan until it just begins to simmer. Pour over chopped chocolate in a bowl and let sit for 5 minutes. Stir until smooth.
- Once the cakes are cool, place one layer on a serving plate. Spread a layer of ganache, then add sliced strawberries. Top with the second cake layer. Pour remaining ganache over the top and let it drip down the sides.
- Garnish with additional strawberries on top. Slice and serve!
Pistachio and Rosewater Cake
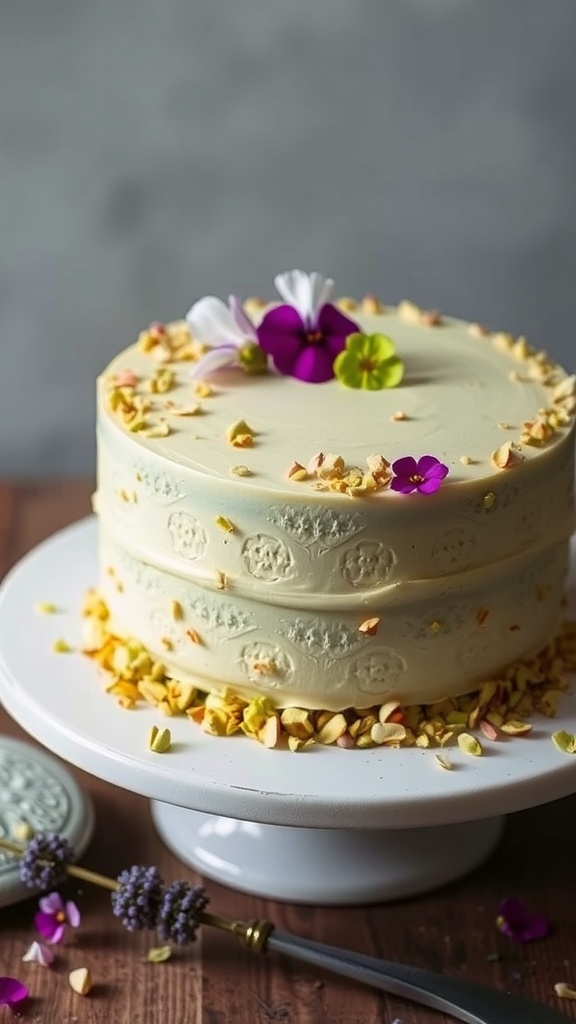
This Pistachio and Rosewater Cake is a delightful treat for any occasion, especially Valentine’s Day. The soft layers of cake are infused with the unique flavors of pistachio and rosewater, creating a sweet and fragrant experience. Topped with crushed pistachios and vibrant edible flowers, it’s not just tasty but also visually stunning.
The cake features a lovely green hue, thanks to the ground pistachios, which adds a nutty flavor. The rosewater brings a floral note that complements the cake perfectly. Each slice is a little piece of heaven, making it a perfect dessert for sharing with someone special.
Here’s how to make this beautiful cake:
Ingredients
- 1 cup unsalted butter, softened
- 1 cup granulated sugar
- 4 large eggs
- 2 cups all-purpose flour
- 1 teaspoon baking powder
- 1/2 teaspoon salt
- 1 cup ground pistachios
- 1/2 cup milk
- 2 tablespoons rosewater
- 1 cup heavy cream
- 1/4 cup powdered sugar
- Crushed pistachios and edible flowers for decoration
Instructions
- Preheat the oven to 350°F (175°C). Grease and flour two 9-inch round cake pans.
- In a large bowl, cream together the softened butter and granulated sugar until light and fluffy. Add the eggs one at a time, mixing well after each addition.
- In another bowl, whisk together the flour, baking powder, salt, and ground pistachios. Gradually add this dry mixture to the butter mixture, alternating with the milk and rosewater. Mix until just combined.
- Divide the batter evenly between the prepared cake pans. Bake for 25-30 minutes or until a toothpick inserted in the center comes out clean.
- Let the cakes cool in the pans for 10 minutes before transferring them to a wire rack to cool completely.
- For the frosting, whip the heavy cream and powdered sugar together until soft peaks form.
- Once the cakes are cool, spread a layer of whipped cream between the two layers and on top. Decorate with crushed pistachios and edible flowers.
- Slice and enjoy your beautiful Pistachio and Rosewater Cake!
Carrot Cake with Cream Cheese Frosting
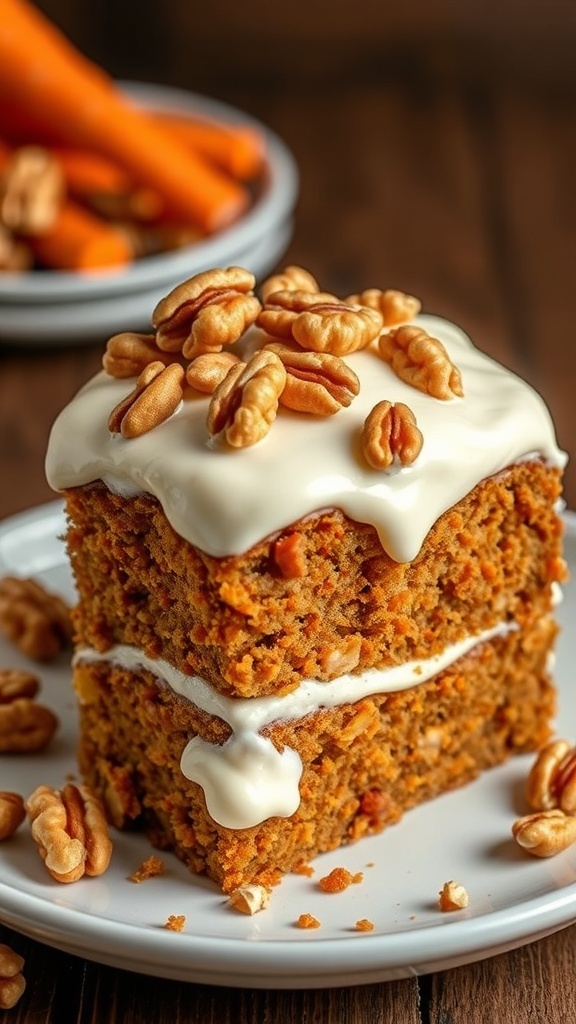
Carrot cake is a delightful treat that brings a touch of warmth and sweetness to any celebration. This cake is moist and flavorful, thanks to the grated carrots that blend perfectly with spices. The cream cheese frosting adds a rich and tangy layer that complements the cake beautifully.
In the image, you can see a beautifully frosted carrot cake topped with walnuts. The cake’s texture looks inviting, and the frosting is smooth and creamy. This dessert is perfect for Valentine’s Day, making it a sweet way to show someone you care.
Let’s get into the recipe so you can create this delicious carrot cake at home!
Ingredients
- 2 cups all-purpose flour
- 2 cups granulated sugar
- 1 teaspoon baking powder
- 1 teaspoon baking soda
- 1 teaspoon ground cinnamon
- 1/2 teaspoon salt
- 1 cup vegetable oil
- 4 large eggs
- 3 cups grated carrots
- 1 cup chopped walnuts (optional)
- 1 teaspoon vanilla extract
- 8 oz cream cheese, softened
- 1/2 cup unsalted butter, softened
- 4 cups powdered sugar
- 1 teaspoon vanilla extract (for frosting)
Instructions
- Preheat your oven to 350°F (175°C). Grease and flour two 9-inch round cake pans.
- In a large bowl, mix flour, sugar, baking powder, baking soda, cinnamon, and salt.
- In another bowl, whisk together oil, eggs, grated carrots, and vanilla extract.
- Combine the wet ingredients with the dry ingredients. Stir until just combined. Fold in walnuts if using.
- Divide the batter evenly between the prepared pans. Bake for 25-30 minutes or until a toothpick comes out clean.
- Let the cakes cool in the pans for 10 minutes before transferring to wire racks to cool completely.
- For the frosting, beat together cream cheese and butter until smooth. Gradually add powdered sugar and vanilla extract, mixing until creamy.
- Once the cakes are completely cool, spread a layer of frosting on top of one cake layer, place the second layer on top, and frost the top and sides of the cake.
- Decorate with additional walnuts if desired. Slice and enjoy your homemade carrot cake!
Vanilla Bean Love Cake
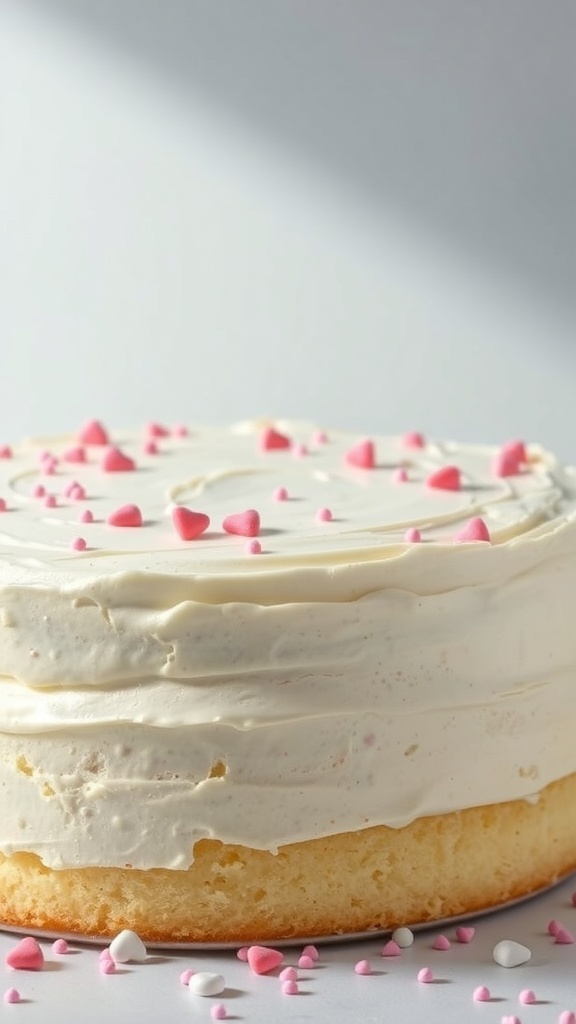
This Vanilla Bean Love Cake is a delightful treat perfect for Valentine’s Day. The cake features a soft, fluffy texture that melts in your mouth. Topped with a creamy vanilla frosting, it’s adorned with cute pink heart sprinkles, making it visually appealing and perfect for celebrating love.
The cake is simple to make, and the vanilla bean adds a rich flavor that elevates it beyond your typical vanilla cake. Whether you’re baking for a special someone or just treating yourself, this cake is sure to bring smiles.
Ingredients
- 2 cups all-purpose flour
- 1 ½ cups granulated sugar
- ½ cup unsalted butter, softened
- 1 cup milk
- 3 large eggs
- 2 teaspoons baking powder
- 1 teaspoon vanilla extract
- 1 vanilla bean, seeds scraped
- ½ teaspoon salt
- 2 cups heavy cream
- 1 cup powdered sugar
- 1 teaspoon vanilla extract (for frosting)
- Pink heart sprinkles for decoration
Instructions
- Preheat your oven to 350°F (175°C). Grease and flour two 9-inch round cake pans.
- In a large bowl, cream together the softened butter and granulated sugar until light and fluffy. Add the eggs, one at a time, mixing well after each addition.
- In another bowl, combine the flour, baking powder, and salt. Gradually add this dry mixture to the butter mixture, alternating with the milk. Stir in the vanilla extract and the seeds from the vanilla bean.
- Divide the batter evenly between the prepared cake pans. Bake for 25-30 minutes, or until a toothpick inserted in the center comes out clean.
- Let the cakes cool in the pans for 10 minutes before transferring them to a wire rack to cool completely.
- For the frosting, whip the heavy cream until soft peaks form. Gradually add the powdered sugar and vanilla extract, continuing to whip until stiff peaks form.
- Once the cakes are cool, spread a layer of frosting on top of one cake layer. Place the second layer on top and frost the top and sides of the cake.
- Decorate with pink heart sprinkles and serve to your loved ones!
Lemon Blueberry Romance Cake
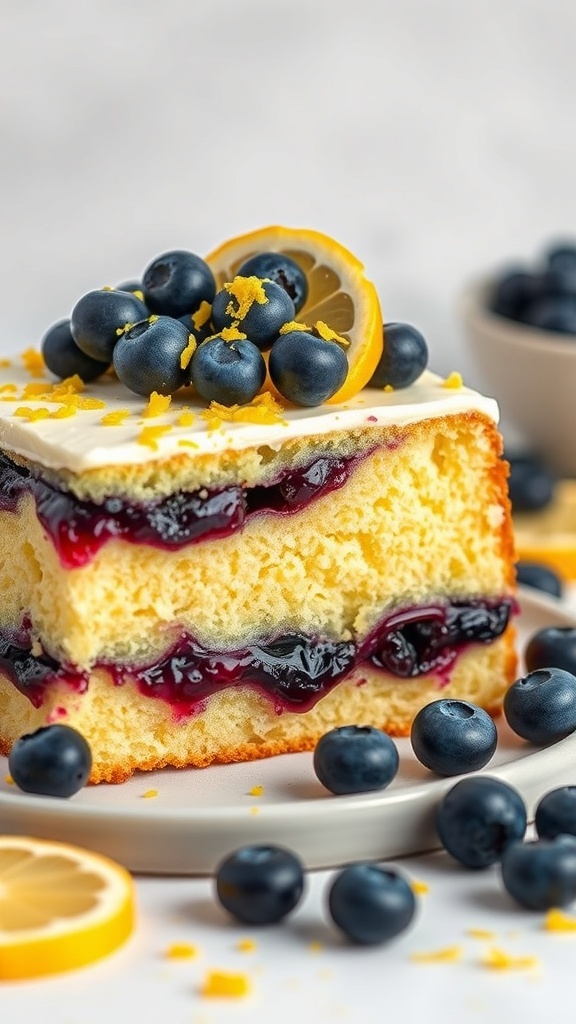
The Lemon Blueberry Romance Cake is a delightful treat that perfectly captures the essence of love and sweetness. This cake features layers of soft, fluffy lemon cake, filled with a luscious blueberry jam that adds a burst of flavor. Topped with a creamy frosting and garnished with fresh blueberries and lemon slices, it’s a feast for both the eyes and the taste buds.
Each bite offers a refreshing zing from the lemon, balanced beautifully by the sweetness of the blueberries. This cake is not just a dessert; it’s a celebration of flavors that makes any occasion special, especially Valentine’s Day.
Making this cake is a fun and rewarding experience. It’s perfect for sharing with someone special or enjoying as a sweet treat for yourself. Let’s get started on creating this lovely dessert!
Ingredients
- 2 cups all-purpose flour
- 1 1/2 cups granulated sugar
- 1/2 cup unsalted butter, softened
- 1 cup milk
- 3 large eggs
- 1 tablespoon baking powder
- 1/4 teaspoon salt
- 1 tablespoon lemon zest
- 1/4 cup lemon juice
- 1 cup blueberry jam
- 1 cup cream cheese, softened
- 2 cups powdered sugar
- 1 teaspoon vanilla extract
- Fresh blueberries and lemon slices for garnish
Instructions
- Preheat the oven to 350°F (175°C). Grease and flour two 9-inch round cake pans.
- In a large bowl, cream together the butter and sugar until light and fluffy. Add the eggs one at a time, mixing well after each addition.
- In another bowl, combine flour, baking powder, and salt. Gradually add this to the butter mixture, alternating with milk. Stir in lemon zest and juice.
- Divide the batter evenly between the prepared pans. Bake for 25-30 minutes, or until a toothpick inserted in the center comes out clean. Let cool in the pans for 10 minutes before transferring to wire racks.
- Once the cakes are completely cool, spread blueberry jam between the layers. Frost the top and sides with cream cheese frosting made by beating together cream cheese, powdered sugar, and vanilla.
- Garnish with fresh blueberries and lemon slices. Slice and enjoy your Lemon Blueberry Romance Cake!
Raspberry Rose Cake
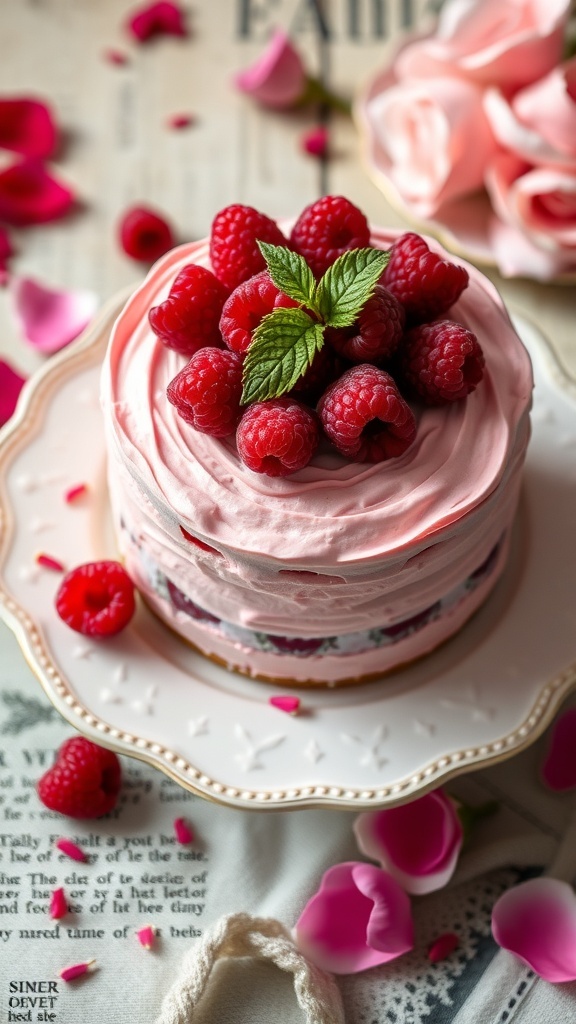
The Raspberry Rose Cake is a stunning treat perfect for Valentine’s Day. Its layers of fluffy cake are filled with raspberry goodness and topped with a light, creamy frosting. The vibrant red raspberries and delicate rose petals create a romantic vibe that’s hard to resist.
This cake is not just a feast for the eyes; it’s also a delight for the taste buds. The combination of sweet raspberries and the floral notes of rose makes it unique. Each slice reveals a beautiful contrast of colors, making it a showstopper at any celebration.
Making this cake is easier than you might think. With a few simple ingredients, you can whip up a dessert that looks like it came from a fancy bakery. Whether you’re celebrating love or just treating yourself, this cake is sure to impress.
Ingredients
- 1 ½ cups all-purpose flour
- 1 cup granulated sugar
- ½ cup unsalted butter, softened
- 2 large eggs
- 1 teaspoon vanilla extract
- ½ cup milk
- 1 teaspoon baking powder
- 1 cup fresh raspberries
- 1 cup heavy cream
- 2 tablespoons powdered sugar
- 1 teaspoon rose water
- Fresh raspberries and mint leaves for decoration
Instructions
- Preheat your oven to 350°F (175°C). Grease and flour two 6-inch round cake pans.
- In a mixing bowl, cream together the softened butter and granulated sugar until light and fluffy. Add the eggs one at a time, mixing well after each addition. Stir in the vanilla extract.
- In a separate bowl, whisk together the flour and baking powder. Gradually add the dry ingredients to the wet mixture, alternating with the milk. Mix until just combined.
- Gently fold in the fresh raspberries. Divide the batter evenly between the prepared cake pans.
- Bake for 25-30 minutes, or until a toothpick inserted in the center comes out clean. Let the cakes cool in the pans for 10 minutes before transferring to wire racks to cool completely.
- While the cakes are cooling, whip the heavy cream with powdered sugar and rose water until soft peaks form.
- Once the cakes are cool, place one layer on a serving plate. Spread a layer of whipped cream on top and add some fresh raspberries. Place the second layer on top and frost the top and sides with the remaining whipped cream.
- Decorate with fresh raspberries and mint leaves. Serve and enjoy your beautiful Raspberry Rose Cake!
Lavender Honey Cake
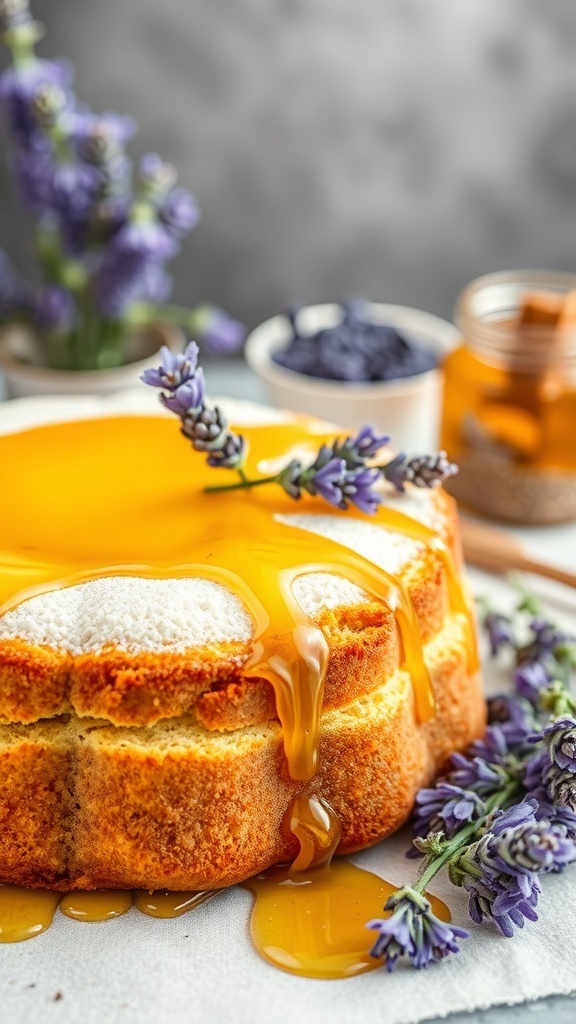
This Lavender Honey Cake is a delightful treat that captures the essence of romance. The soft, golden layers are infused with the subtle flavor of lavender, making it a perfect dessert for Valentine’s Day. The cake is drizzled with a sweet honey glaze that adds a touch of sweetness and a beautiful shine.
Surrounded by fresh lavender sprigs, the cake not only tastes great but also looks stunning. The combination of floral notes and honey creates a unique flavor profile that will impress anyone who takes a bite. It’s a lovely way to celebrate love and sweetness.
Ingredients
- 1 ½ cups all-purpose flour
- 1 teaspoon baking powder
- ½ teaspoon baking soda
- ¼ teaspoon salt
- ½ cup unsalted butter, softened
- 1 cup granulated sugar
- 2 large eggs
- 1 teaspoon vanilla extract
- ½ cup milk
- 2 tablespoons dried lavender
- ½ cup honey
Instructions
- Preheat your oven to 350°F (175°C). Grease and flour a round cake pan.
- In a bowl, mix flour, baking powder, baking soda, and salt. Set aside.
- In another bowl, cream together the butter and sugar until light and fluffy. Add eggs one at a time, mixing well after each addition. Stir in vanilla.
- Gradually add the dry ingredients to the wet mixture, alternating with milk. Mix until just combined. Gently fold in the dried lavender.
- Pour the batter into the prepared cake pan and bake for 25-30 minutes, or until a toothpick comes out clean.
- While the cake cools, prepare the honey glaze by warming the honey slightly until it’s pourable.
- Once the cake is cool, drizzle the honey over the top and garnish with fresh lavender sprigs. Slice and serve!
Tiramisu Cake with Coffee Infusion
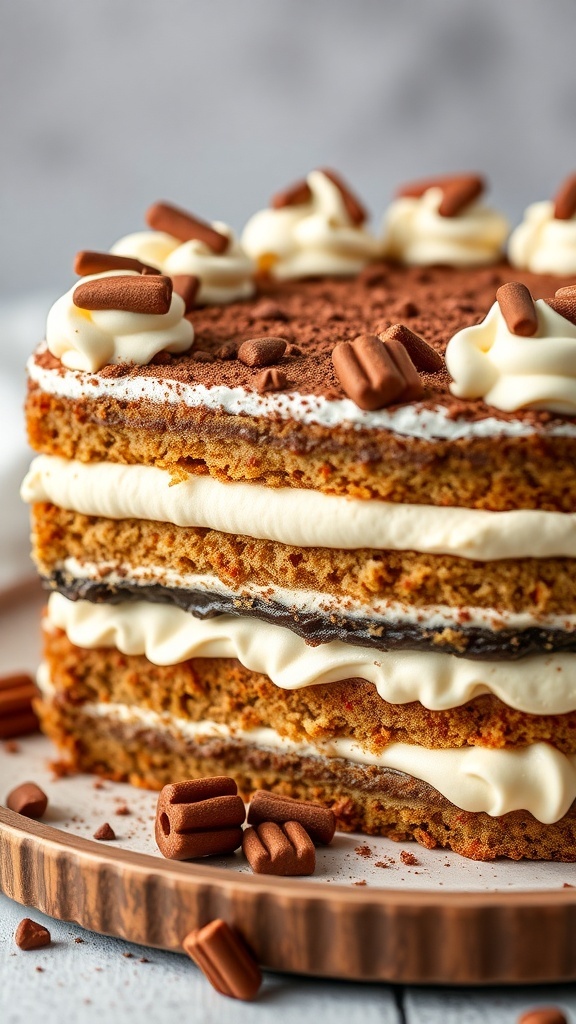
Tiramisu cake is a delightful treat that combines rich flavors and a creamy texture. This cake is layered with coffee-soaked sponge and luscious mascarpone cream, making it a perfect dessert for any occasion. The image showcases a beautifully crafted tiramisu cake, topped with swirls of whipped cream and chocolate accents. Each layer promises a burst of coffee goodness, making it an ideal choice for coffee lovers.
The cake is not just a feast for the eyes; it’s also a joy to make. You can easily whip this up for a special celebration or just to satisfy your sweet tooth. The combination of coffee and cream creates a comforting experience that everyone will love.
Ingredients
- 2 cups brewed coffee, cooled
- 1 cup heavy cream
- 8 oz mascarpone cheese
- 1/2 cup granulated sugar
- 1 teaspoon vanilla extract
- 1 package ladyfinger cookies
- Cocoa powder for dusting
- Chocolate shavings for garnish
Instructions
- Prepare the Coffee: Brew your coffee and let it cool completely.
- Make the Cream: In a bowl, whip the heavy cream until soft peaks form. In another bowl, mix mascarpone cheese, sugar, and vanilla until smooth. Gently fold the whipped cream into the mascarpone mixture.
- Assemble the Cake: Dip each ladyfinger into the cooled coffee for a few seconds, then layer them in a cake dish. Spread a layer of the mascarpone cream over the ladyfingers. Repeat the process until you have several layers, finishing with the cream on top.
- Chill: Cover the cake and refrigerate for at least 4 hours, or overnight for best results.
- Serve: Before serving, dust the top with cocoa powder and add chocolate shavings for a decorative touch.
Nutella Swirl Cake
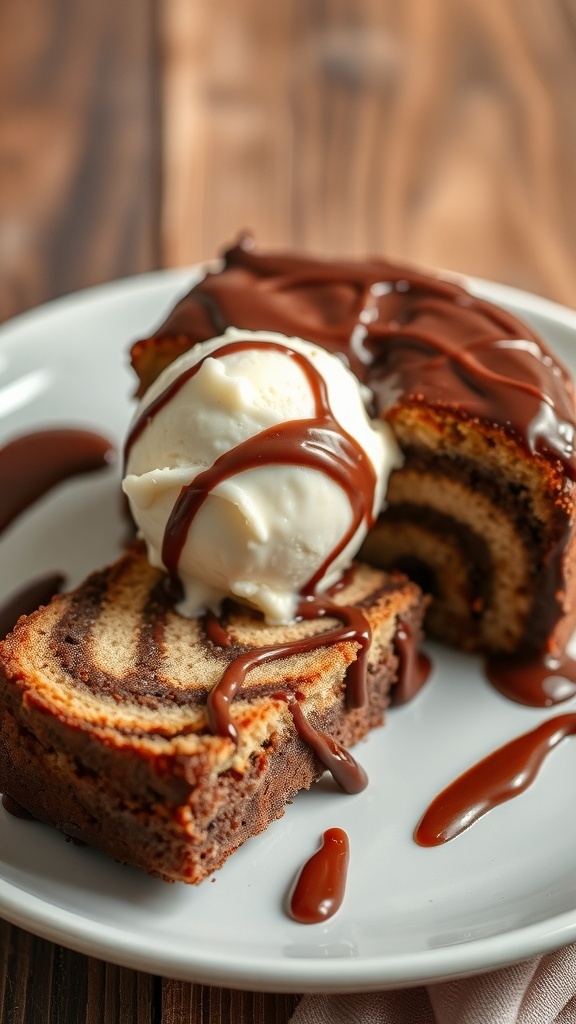
Nutella Swirl Cake is a delightful treat that combines rich chocolate and creamy hazelnut flavors. This cake is perfect for Valentine’s Day or any special occasion. The swirls of Nutella create a beautiful pattern that makes each slice a visual delight.
Imagine cutting into a moist cake, revealing the gorgeous marbled effect. The chocolatey aroma fills the air, making it hard to resist. Pair it with a scoop of vanilla ice cream, and you have a dessert that’s sure to impress.
Making this cake is straightforward and fun. You’ll mix up a simple batter, then swirl in the Nutella for that signature look. It’s a great way to show your loved ones just how much you care.
Ingredients
- 1 ¾ cups all-purpose flour
- 1 cup granulated sugar
- ½ cup unsweetened cocoa powder
- 1 teaspoon baking powder
- ½ teaspoon baking soda
- ½ teaspoon salt
- ¾ cup unsalted butter, softened
- 3 large eggs
- 1 teaspoon vanilla extract
- 1 cup buttermilk
- ½ cup Nutella
Instructions
- Preheat your oven to 350°F (175°C). Grease and flour a loaf pan.
- In a large bowl, mix flour, sugar, cocoa powder, baking powder, baking soda, and salt.
- Add softened butter, eggs, vanilla, and buttermilk. Beat until smooth.
- Pour half of the batter into the prepared pan. Spoon half of the Nutella over the batter and swirl with a knife. Repeat with the remaining batter and Nutella.
- Bake for 50-60 minutes or until a toothpick comes out clean. Let it cool before slicing.
Peanut Butter Cup Cake
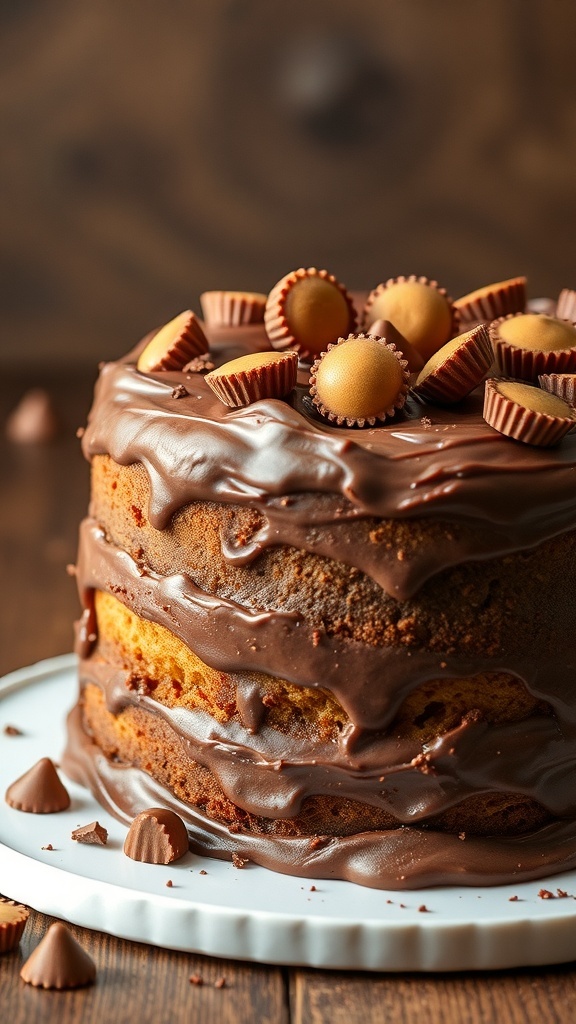
This Peanut Butter Cup Cake is a delightful treat for any occasion, especially Valentine’s Day. The rich layers of cake are perfectly complemented by a smooth chocolate frosting, making it a true chocolate lover’s dream. Topped with mini peanut butter cups, it’s both fun and festive.
The cake itself is moist and fluffy, with a lovely peanut butter flavor that pairs beautifully with the chocolate. Each bite is a sweet celebration of flavors that will make your heart skip a beat.
Whether you’re baking for a loved one or treating yourself, this cake is sure to impress. It’s easy to make and even easier to enjoy!
Ingredients
- 1 ½ cups all-purpose flour
- 1 cup granulated sugar
- ½ cup unsweetened cocoa powder
- 1 teaspoon baking powder
- ½ teaspoon baking soda
- ½ teaspoon salt
- ½ cup unsalted butter, softened
- 2 large eggs
- 1 cup buttermilk
- 1 teaspoon vanilla extract
- 1 cup creamy peanut butter
- 1 cup powdered sugar
- ½ cup heavy cream
- 1 cup mini peanut butter cups, for topping
Instructions
- Preheat the oven to 350°F (175°C). Grease and flour two 9-inch round cake pans.
- In a large bowl, mix flour, sugar, cocoa powder, baking powder, baking soda, and salt.
- Add softened butter, eggs, buttermilk, and vanilla extract. Beat on medium speed until well combined.
- Divide the batter evenly between the prepared pans. Bake for 25-30 minutes or until a toothpick inserted in the center comes out clean.
- Let the cakes cool in the pans for 10 minutes, then turn them out onto wire racks to cool completely.
- For the frosting, beat together peanut butter, powdered sugar, and heavy cream until smooth and fluffy.
- Once the cakes are cool, spread a layer of frosting between the two cake layers. Frost the top and sides of the cake with the remaining frosting.
- Top with mini peanut butter cups for decoration. Slice and serve!
Cherry Almond Cake
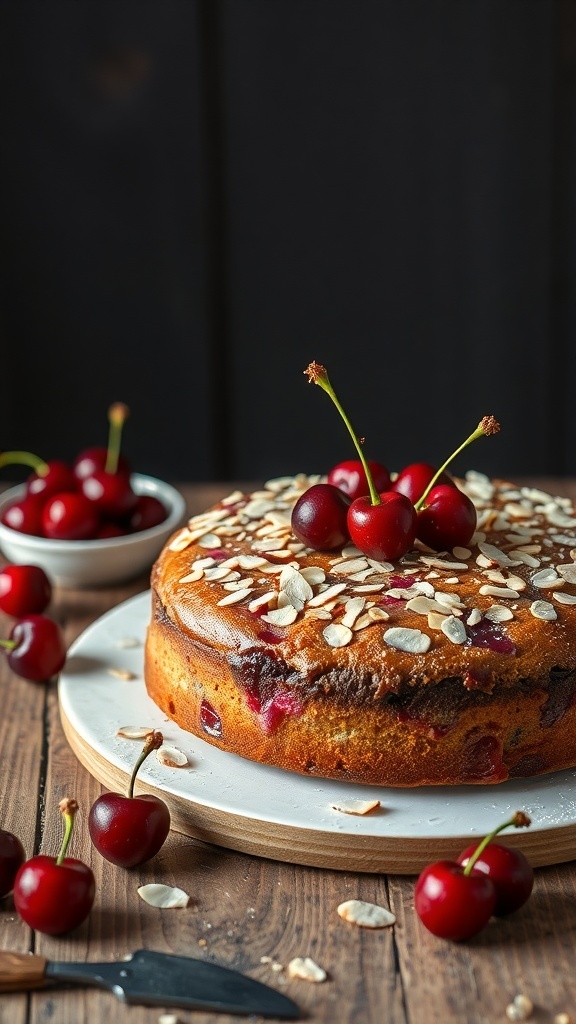
Cherry almond cake is a delightful treat perfect for Valentine’s Day. The combination of sweet cherries and nutty almond flavor creates a lovely balance that everyone will enjoy. The cake is moist and fluffy, making it a great centerpiece for any celebration.
In the image, you can see a beautifully baked cherry almond cake topped with fresh cherries and sliced almonds. The vibrant red cherries pop against the golden cake, making it visually appealing. The wooden backdrop adds a rustic charm, enhancing the overall presentation.
This cake is not just pretty; it’s also simple to make. With just a few ingredients, you can whip up a delicious dessert that will impress your loved ones. Let’s get to the recipe!
Ingredients
- 1 cup all-purpose flour
- 1/2 cup almond flour
- 1 teaspoon baking powder
- 1/4 teaspoon salt
- 1/2 cup unsalted butter, softened
- 3/4 cup granulated sugar
- 2 large eggs
- 1 teaspoon almond extract
- 1/2 cup milk
- 1 cup pitted cherries, halved
- 1/4 cup sliced almonds for topping
Instructions
- Preheat the oven to 350°F (175°C). Grease a round cake pan.
- In a bowl, mix the all-purpose flour, almond flour, baking powder, and salt.
- In another bowl, cream the softened butter and sugar until light and fluffy. Add the eggs one at a time, mixing well after each addition. Stir in the almond extract.
- Gradually add the flour mixture to the butter mixture, alternating with the milk. Mix until just combined.
- Fold in the cherries gently.
- Pour the batter into the prepared cake pan. Sprinkle sliced almonds on top.
- Bake for 30-35 minutes or until a toothpick inserted in the center comes out clean.
- Let the cake cool in the pan for 10 minutes before transferring it to a wire rack to cool completely.
- Serve with extra cherries on top if desired. Enjoy your cherry almond cake!
Marble Cake with Fondant Hearts
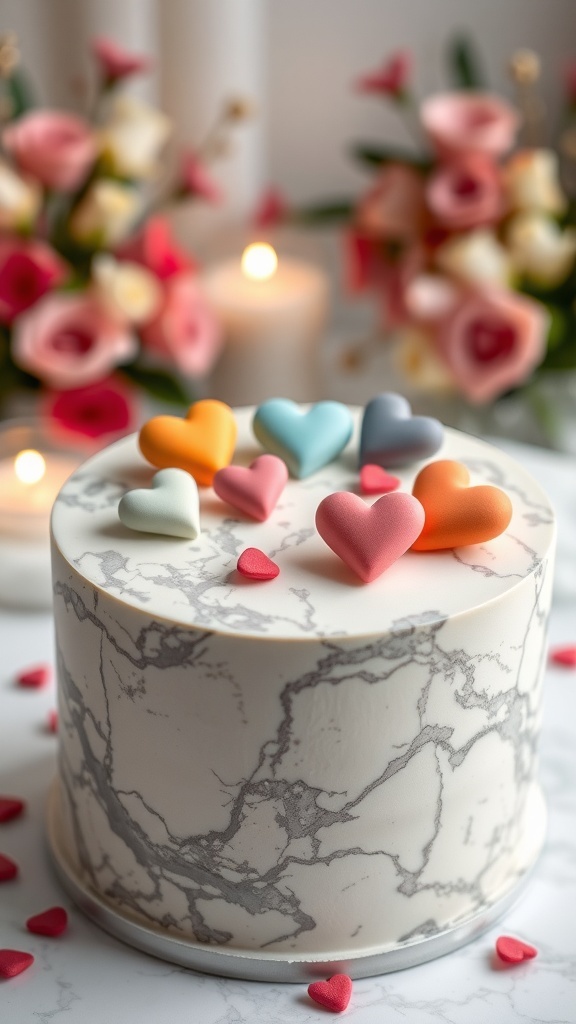
This marble cake is a delightful treat for Valentine’s Day. The cake features a beautiful marbled design, combining rich chocolate and vanilla flavors. Topped with colorful fondant hearts, it radiates love and joy. The soft texture of the cake pairs perfectly with the sweetness of the fondant, making it a hit for any celebration.
The background adds to the charm with lovely flowers and soft candlelight, creating a warm atmosphere. This cake not only looks stunning but also tastes amazing, making it a perfect centerpiece for your Valentine’s festivities.
Ingredients
- 2 cups all-purpose flour
- 1 1/2 cups granulated sugar
- 1 cup unsalted butter, softened
- 4 large eggs
- 1 cup milk
- 2 teaspoons baking powder
- 1 teaspoon vanilla extract
- 1/2 cup cocoa powder
- 1/4 teaspoon salt
- Fondant in various colors for decoration
Instructions
- Preheat your oven to 350°F (175°C). Grease and flour two 9-inch round cake pans.
- In a large bowl, cream together the butter and sugar until light and fluffy. Add the eggs one at a time, mixing well after each addition.
- In another bowl, combine the flour, baking powder, and salt. Gradually add this mixture to the creamed mixture, alternating with the milk. Stir in the vanilla extract.
- Divide the batter into two bowls. In one bowl, mix in the cocoa powder until well combined.
- To create the marble effect, spoon alternating dollops of the vanilla and chocolate batter into the prepared pans. Use a knife to swirl the batters together gently.
- Bake for 25-30 minutes or until a toothpick inserted in the center comes out clean. Let the cakes cool in the pans for 10 minutes before transferring to wire racks to cool completely.
- Once cooled, cover the cakes with fondant and decorate with fondant hearts in various colors.
Coconut Cream Cake
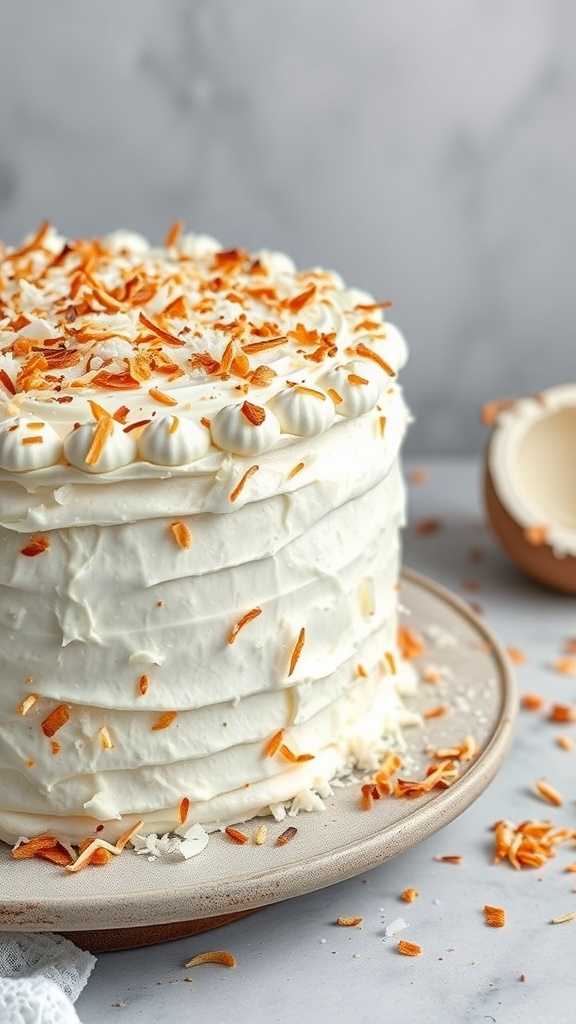
Coconut cream cake is a delightful treat that brings a taste of tropical paradise to any celebration. This cake is layered with fluffy coconut cream frosting and topped with toasted coconut flakes, making it a perfect choice for Valentine’s Day or any special occasion. The light and airy texture of the cake pairs beautifully with the rich coconut flavor, creating a dessert that’s both comforting and refreshing.
The cake features a smooth, creamy frosting that’s easy to spread, giving it a lovely finish. The toasted coconut on top adds a nice crunch and a burst of flavor that complements the soft layers beneath. It’s a cake that not only looks stunning but also tastes incredible, making it a showstopper at any gathering.
Whether you’re baking for a loved one or treating yourself, this coconut cream cake is sure to impress. It’s simple enough for a novice baker yet elegant enough for a seasoned pro. So, let’s get into the recipe!
Ingredients
- 2 cups all-purpose flour
- 1 ½ cups granulated sugar
- 1 tablespoon baking powder
- ½ teaspoon salt
- ½ cup unsalted butter, softened
- 1 cup coconut milk
- 3 large eggs
- 1 teaspoon vanilla extract
- 1 cup shredded coconut
- 2 cups heavy cream
- 1 cup powdered sugar
- 1 teaspoon vanilla extract (for frosting)
- 1 cup toasted coconut flakes (for topping)
Instructions
- Preheat the oven to 350°F (175°C). Grease and flour two 9-inch round cake pans.
- In a large bowl, mix flour, sugar, baking powder, and salt. Add softened butter, coconut milk, eggs, and vanilla extract. Beat until smooth.
- Fold in the shredded coconut until evenly distributed.
- Divide the batter between the prepared pans and bake for 25-30 minutes, or until a toothpick inserted in the center comes out clean.
- Let the cakes cool in the pans for 10 minutes, then transfer to wire racks to cool completely.
- For the frosting, whip the heavy cream until soft peaks form. Gradually add powdered sugar and vanilla extract, continuing to whip until stiff peaks form.
- Once the cakes are cool, place one layer on a serving plate. Spread a layer of frosting on top, then place the second layer on top. Frost the top and sides of the cake.
- Sprinkle toasted coconut flakes over the top and sides of the cake for decoration.
- Slice and enjoy your delicious coconut cream cake!
S’mores Cake with Toasted Marshmallows
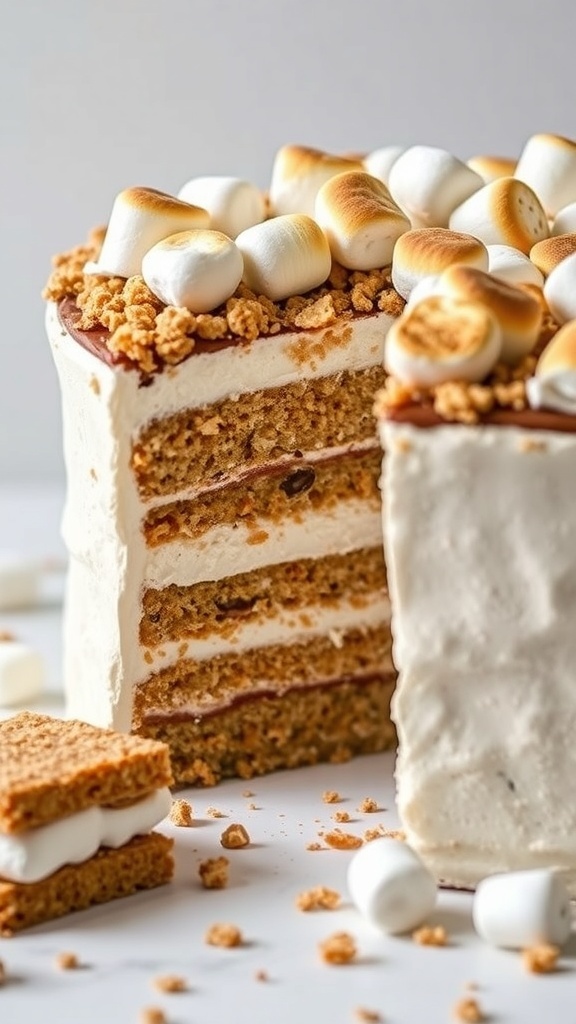
Picture a cake that captures the essence of a classic campfire treat. This S’mores Cake is a delightful blend of flavors and textures. The layers of graham cracker cake are soft and moist, perfectly complemented by rich chocolate ganache and fluffy marshmallow frosting. Topping it all off are toasted marshmallows that add a golden crunch and a hint of smokiness.
The cake is not just a feast for the eyes; it’s a sweet reminder of cozy evenings spent around a fire. Each slice offers a taste of nostalgia, making it perfect for celebrations or just a sweet treat at home. Whether you’re a fan of s’mores or just love cake, this dessert is sure to impress.
Now, let’s get into how to make this delicious S’mores Cake!
Ingredients
- 1 ½ cups all-purpose flour
- 1 cup graham cracker crumbs
- 1 teaspoon baking powder
- ½ teaspoon baking soda
- ½ teaspoon salt
- ½ cup unsalted butter, softened
- 1 cup granulated sugar
- 2 large eggs
- 1 teaspoon vanilla extract
- 1 cup buttermilk
- 1 cup chocolate ganache (made from 1 cup heavy cream and 8 oz chocolate)
- 2 cups marshmallow fluff
- Mini marshmallows for topping
- Graham cracker crumbs for garnish
Instructions
- Preheat your oven to 350°F (175°C). Grease and flour two 9-inch round cake pans.
- In a bowl, mix flour, graham cracker crumbs, baking powder, baking soda, and salt.
- In another bowl, cream together the butter and sugar until light and fluffy. Add eggs one at a time, mixing well after each addition. Stir in vanilla.
- Gradually add the dry ingredients to the wet mixture, alternating with buttermilk. Mix until just combined.
- Divide the batter evenly between the prepared pans. Bake for 25-30 minutes or until a toothpick comes out clean.
- Let the cakes cool in the pans for 10 minutes, then transfer to wire racks to cool completely.
- Once cooled, spread a layer of chocolate ganache on top of one cake layer. Add a layer of marshmallow fluff, then place the second layer on top.
- Frost the top and sides of the cake with more marshmallow fluff. Use a kitchen torch to toast the mini marshmallows on top until golden brown.
- Sprinkle graham cracker crumbs over the toasted marshmallows for an extra crunch.
- Slice and enjoy your S’mores Cake!
Matcha Green Tea Cake
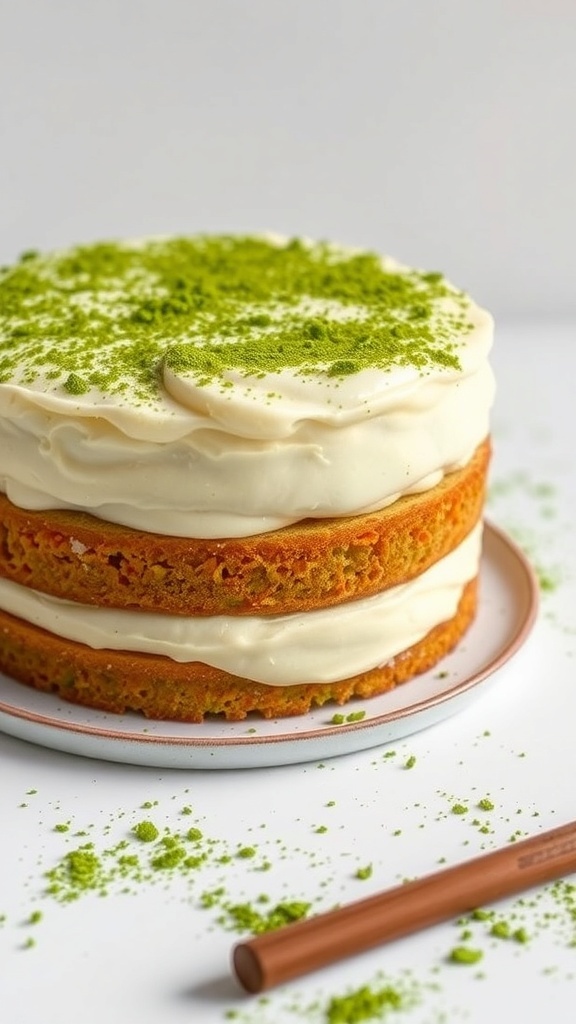
Matcha green tea cake is a delightful treat that combines the earthy flavors of matcha with a light, fluffy texture. This cake is perfect for celebrating special occasions like Valentine’s Day. The vibrant green color adds a unique touch, making it visually appealing.
The cake is layered with a creamy frosting that complements the matcha perfectly. Each bite offers a balance of sweetness and the distinct taste of green tea. It’s a great way to impress your loved ones with something a bit different.
Making this cake is easier than it looks. You’ll need simple ingredients that come together to create a delicious dessert. Let’s get into the recipe!
Ingredients
- 1 ½ cups all-purpose flour
- 1 cup granulated sugar
- ½ cup unsalted butter, softened
- 2 large eggs
- ½ cup milk
- 2 tablespoons matcha green tea powder
- 2 teaspoons baking powder
- ½ teaspoon salt
- 1 teaspoon vanilla extract
Instructions
- Preheat your oven to 350°F (175°C). Grease and flour two 8-inch round cake pans.
- In a large bowl, cream together the softened butter and sugar until light and fluffy. Add the eggs one at a time, mixing well after each addition.
- In another bowl, whisk together the flour, matcha powder, baking powder, and salt.
- Gradually add the dry ingredients to the butter mixture, alternating with the milk. Mix until just combined. Stir in the vanilla extract.
- Divide the batter evenly between the prepared pans. Bake for 25-30 minutes or until a toothpick inserted in the center comes out clean.
- Let the cakes cool in the pans for 10 minutes before transferring them to a wire rack to cool completely.
- Once cooled, frost with your favorite cream cheese frosting and sprinkle some extra matcha on top for decoration.
Gingerbread Heart Cake
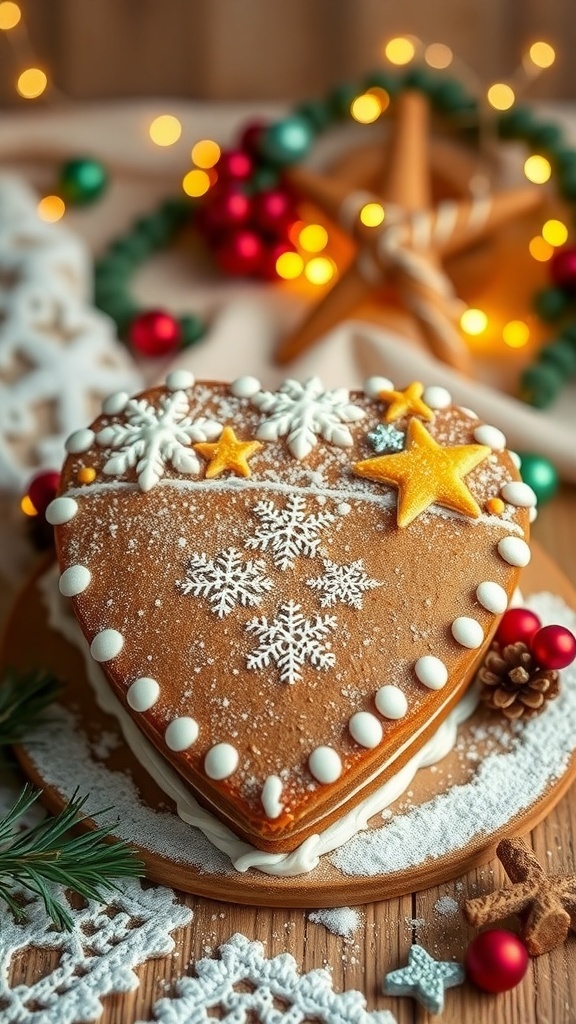
The Gingerbread Heart Cake is a delightful treat that captures the spirit of love and warmth. Its heart shape makes it perfect for special occasions like Valentine’s Day. The cake is beautifully decorated with white icing, snowflakes, and colorful stars, creating a festive look that’s sure to impress.
This cake not only looks great but also has a wonderful gingerbread flavor that is both spicy and sweet. The aroma of ginger, cinnamon, and nutmeg fills the air as it bakes, making it hard to resist. It’s a great way to show someone you care, whether it’s for a partner, friend, or family member.
To make this cake, gather your ingredients and follow the simple steps. It’s a fun project that can involve the whole family. Let’s get started on creating this heartwarming dessert!
Ingredients
- 2 1/2 cups all-purpose flour
- 1 teaspoon baking soda
- 1 tablespoon ground ginger
- 1 tablespoon ground cinnamon
- 1/2 teaspoon ground nutmeg
- 1/2 teaspoon salt
- 1/2 cup unsalted butter, softened
- 1 cup brown sugar, packed
- 1 large egg
- 1/2 cup molasses
- 1 teaspoon vanilla extract
- 1 cup powdered sugar (for icing)
- Decorative icing and toppings (like stars and snowflakes)
Instructions
- Preheat your oven to 350°F (175°C). Grease and flour a heart-shaped cake pan.
- In a bowl, whisk together flour, baking soda, ginger, cinnamon, nutmeg, and salt.
- In another bowl, cream the softened butter and brown sugar until light and fluffy. Add the egg, molasses, and vanilla, mixing well.
- Gradually add the dry ingredients to the wet mixture, stirring until combined.
- Pour the batter into the prepared cake pan and smooth the top. Bake for 25-30 minutes or until a toothpick comes out clean.
- Let the cake cool in the pan for 10 minutes, then transfer it to a wire rack to cool completely.
- Once cooled, prepare the icing by mixing powdered sugar with a little water until smooth. Decorate the cake with the icing and your chosen toppings.
Chocolate Raspberry Mousse Cake

Chocolate Raspberry Mousse Cake is a delightful treat that perfectly captures the essence of Valentine’s Day. This cake features a rich chocolate mousse layered with fresh raspberries, creating a beautiful contrast of flavors. The glossy chocolate ganache on top adds a touch of elegance, making it a showstopper for any romantic occasion.
The cake is not only visually stunning but also incredibly delicious. The combination of creamy chocolate and tart raspberries makes every bite a delightful experience. It’s a dessert that says ‘I love you’ in the sweetest way possible.
To make this cake, you’ll need a few key ingredients. The base is made from chocolate cookies, while the mousse is crafted from high-quality chocolate and fresh cream. Topped with fresh raspberries and mint leaves, it’s a feast for the eyes and the palate.
Ingredients
- 1 ½ cups chocolate cookie crumbs
- ½ cup unsalted butter, melted
- 8 oz dark chocolate, chopped
- 2 cups heavy cream
- ½ cup powdered sugar
- 1 teaspoon vanilla extract
- 1 cup fresh raspberries
- ½ cup chocolate ganache (for topping)
- Fresh mint leaves (for garnish)
Instructions
- Prepare the Crust: Preheat your oven to 350°F (175°C). In a bowl, mix the chocolate cookie crumbs with melted butter. Press the mixture into the bottom of a springform pan to form a crust. Bake for 10 minutes and let it cool.
- Make the Mousse: Melt the dark chocolate in a heatproof bowl over simmering water. In another bowl, whip the heavy cream until soft peaks form. Gradually add powdered sugar and vanilla extract. Fold the melted chocolate into the whipped cream until well combined.
- Layer the Cake: Pour half of the mousse over the cooled crust. Scatter half of the fresh raspberries on top. Add the remaining mousse and smooth the top. Refrigerate for at least 4 hours or until set.
- Finish with Ganache: Once set, pour the chocolate ganache over the top of the cake, allowing it to drip down the sides. Decorate with the remaining raspberries and mint leaves.
- Serve: Carefully remove the sides of the springform pan. Slice and serve this beautiful cake to your loved ones!
Orange Blossom Cake
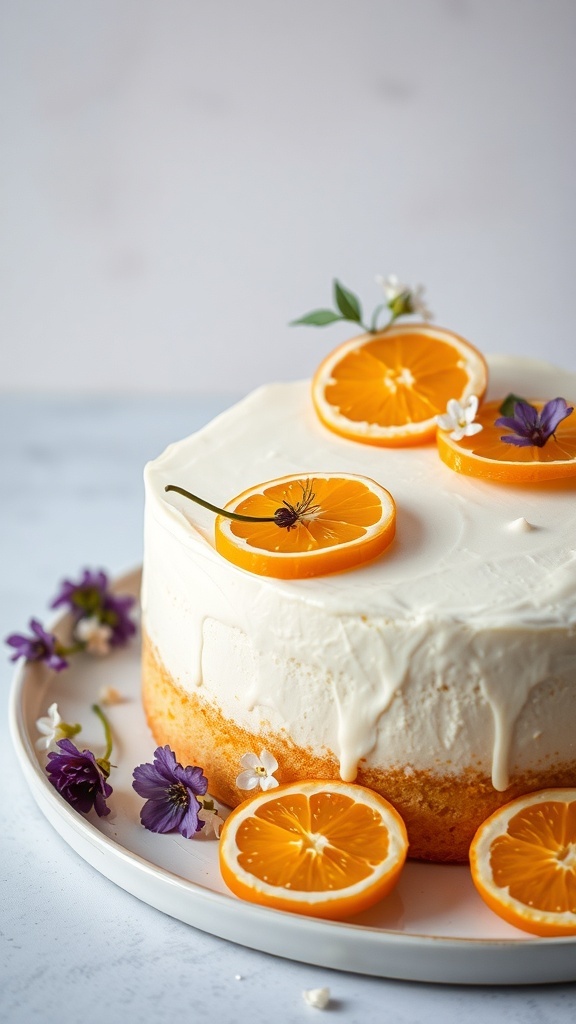
Orange Blossom Cake is a delightful treat that brings a burst of citrus flavor to any celebration. This cake is not just a feast for the eyes; it’s also a delicious way to celebrate love on Valentine’s Day. The cake is beautifully decorated with fresh orange slices and delicate flowers, making it a perfect centerpiece for your dessert table.
The light and fluffy texture of the cake pairs wonderfully with the creamy frosting. Each bite offers a refreshing taste of orange that is both sweet and tangy. It’s a lovely way to show someone you care, especially when baked with love.
Making this cake is straightforward and fun. You’ll be amazed at how simple ingredients can come together to create something so special. Whether you’re celebrating Valentine’s Day or just want to treat yourself, this cake is sure to impress.
Ingredients
- 1 ½ cups all-purpose flour
- 1 cup granulated sugar
- ½ cup unsalted butter, softened
- 3 large eggs
- 1 cup orange juice
- 2 teaspoons baking powder
- 1 teaspoon vanilla extract
- ½ teaspoon salt
- 1 cup heavy cream
- 2 tablespoons powdered sugar
- Fresh orange slices for decoration
- Edible flowers for decoration
Instructions
- Preheat your oven to 350°F (175°C). Grease and flour a round cake pan.
- In a large bowl, cream together the softened butter and granulated sugar until light and fluffy.
- Add the eggs one at a time, mixing well after each addition. Stir in the orange juice and vanilla extract.
- In another bowl, whisk together the flour, baking powder, and salt. Gradually add this mixture to the wet ingredients, mixing until just combined.
- Pour the batter into the prepared cake pan and bake for 25-30 minutes, or until a toothpick inserted in the center comes out clean.
- While the cake cools, whip the heavy cream with powdered sugar until soft peaks form.
- Once the cake is completely cool, frost the top with whipped cream. Decorate with fresh orange slices and edible flowers.
- Slice, serve, and enjoy your Orange Blossom Cake!